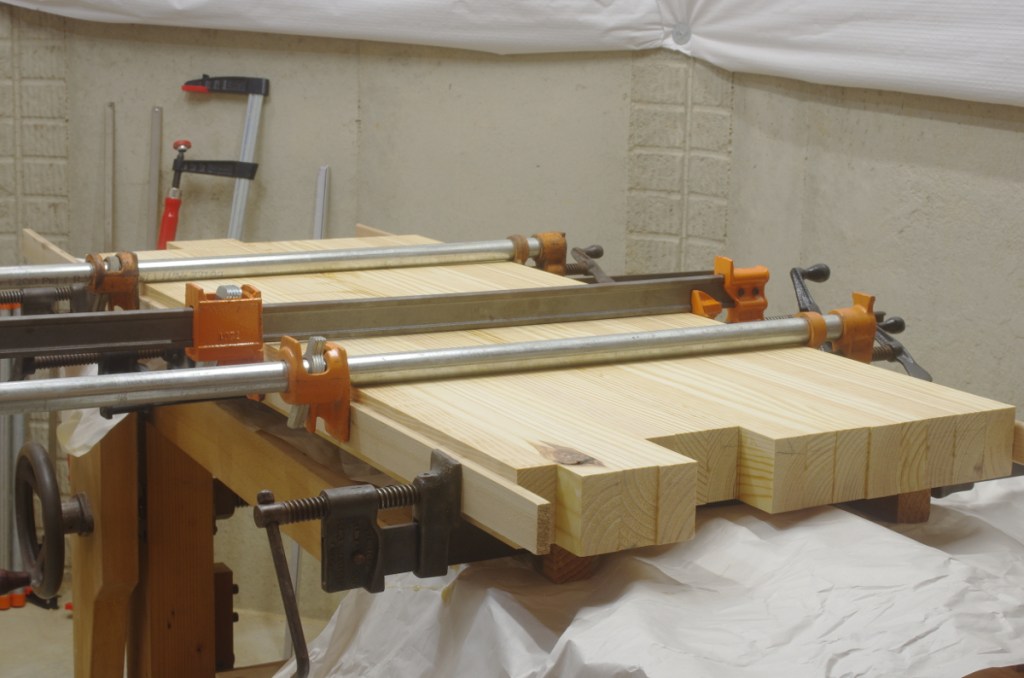
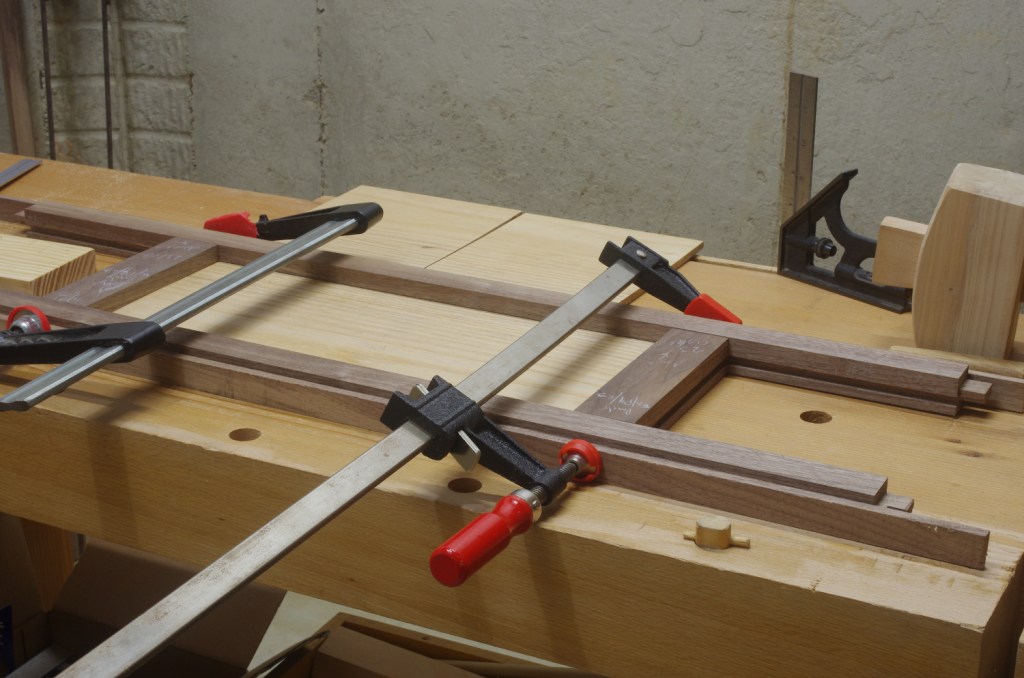
It’s been nothing but milling and glue-ups here. I’ve got the front and rear stretchers laminated, waiting for final dimensions, and the side stretchers are also nearly complete. I tackled the big task of jointing the two halves of the top and gluing them up today:
Huh, this is not looking too much different than my past post.
As was the case with my main workbench, this was a bit more painstaking than gluing up a bunch of narrow pieces because you can’t really count on any flex from the two halves. So there was a bit of back-and-forth of checking to see if the surfaces were mating, plus the annoyance of the jointer plane’s blade being not quite wide enough to swipe the whole edge at once. Oh yeah, and I don’t think my “straightedge” is as straight as it once was. Maybe I ought to do something about that.
I still have to slap on two pieces of maple on either side. I’ll probably leave this top in its current place while I do that. That should be a lot easier, as the maple is a lot thinner and more flexible.
In any case, we’re almost ready to do some legs and essentially get this project done. How long can 12 little ol’ mortise-and-tenon joints take, anyway?
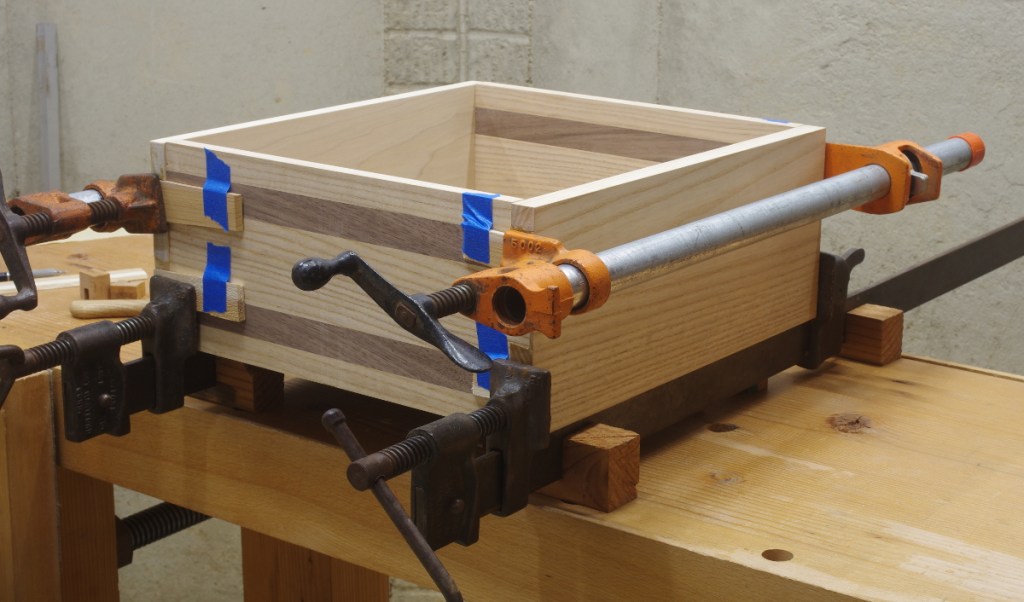
Having applied the glue, I just put the second drawer for the coffee table in the clamps:
I did the first one yesterday. As I expected (because I haven’t glued up any kind of carcase construction in quite some time), that one took some wrangling, but it got there. This second one went smoothly.
Part of the trouble yesterday was in clamping. Most of my stronger clamps are also quite long and heavy, making it difficult to clamp smaller gaps at the top of a piece without tipping over or at least having difficulty manipulating them. To help matters a little, I bought a pair of shorter pipes for my pipe clamps today, which I put to use here.
But as it happens, I do find myself somewhat clamp-challenged at the moment. Back in California, I was fortunate to have been able to borrow a number of pipe clamps from a friend when I needed them. The two that I have now came from a yard sale about a year ago. I’d like to pick up a few more this year. I guess the PATINA Damascus sale is in two weeks, though I’m a little skeptical about finding clamps there. I’ve had the best luck with clamps at yard sales; I just haven’t gone to many lately.
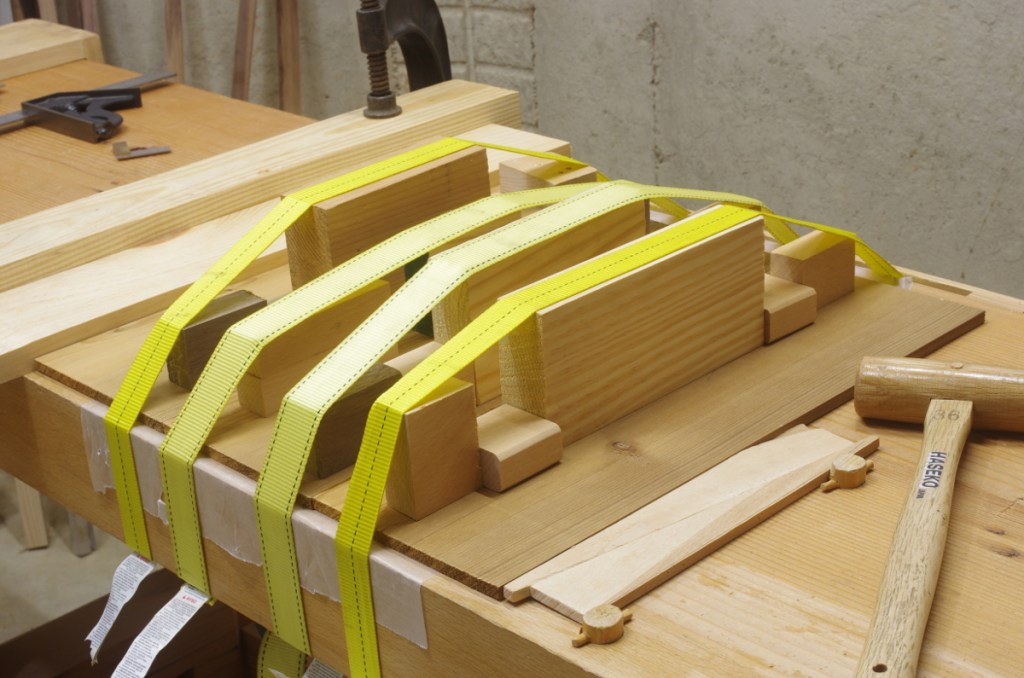
Yesterday’s oafishness had a predictable result: One of the panel pieces rode up ever so slightly in the rear, so I’ll need to plane that down a little more than desired. For the second drawer bottom, I came to my senses and did it this way:
This looks somewhat complicated, but it’s not. Instead of the twine that I was originally going to use, I used the ratcheting tie-down straps that I also use for securing lumber to my roof rack. The ratcheting mechanisms are underneath the bench, upside-down. It’s also a decent excuse for keeping weird little cut-offs around.
This method takes a little longer to set up, but is more effective, and is easier to manipulate.
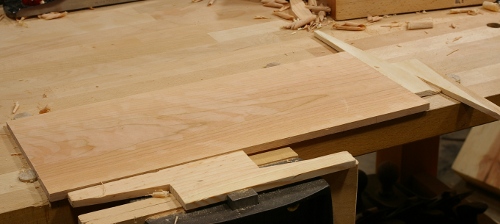
I’ve got all of the pieces for the coffee table drawer bottoms ready. Here are the three components of one of them:
These are western redcedar, resawn from an inexpensive S1S 1×6. These aren’t quite as nice as the quartersawn stock that I used earlier, but are largely defect-free. The knots that you see here won’t be in the bottoms; they’ll be trimmed off.
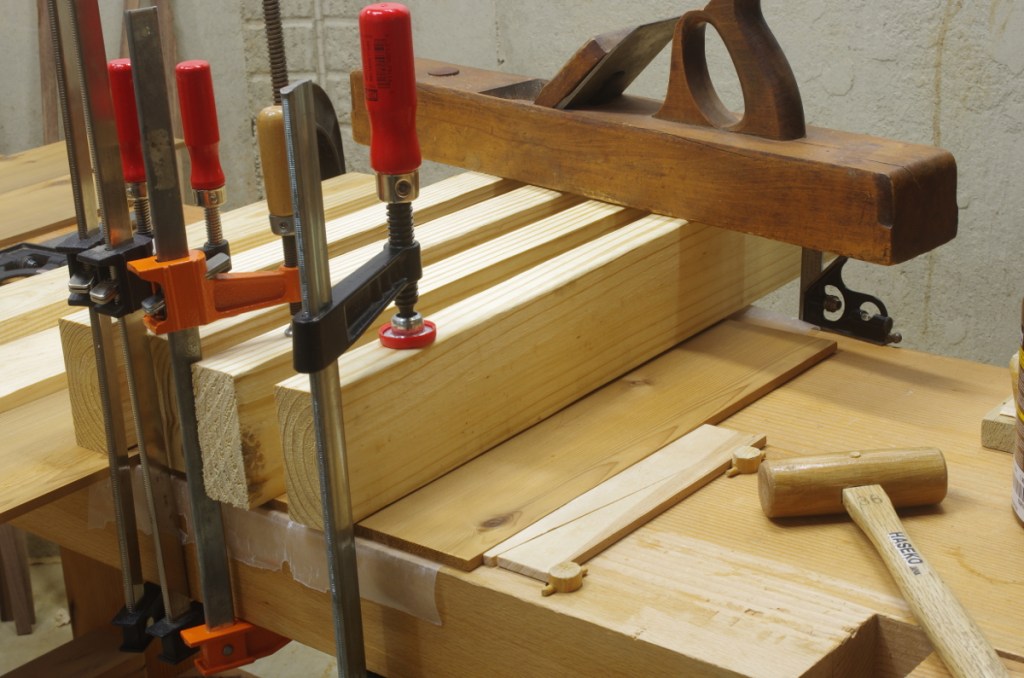
I glued up one of the bottoms today, and it looks completely ridiculous:
Like some other panel glue-ups, I used dual wedges on one side to apply pressure along the edge joints. But here, I’m using pieces of SYP to press down on the panels so that they don’t accidentally ride up. That big wooden jointer plane is supposed to add weight to that side.
This was an idiotic idea, and probably didn’t really work terribly well, at least in terms of keeping the joint flat (I’m going to do a final planing anyway, but still). The method that I used back when I was gluing up some other panels was far better. The reason I didn’t do it this time was lame: I didn’t feel like searching for the twine that I used before. But I think I will do it for the other drawer bottom.
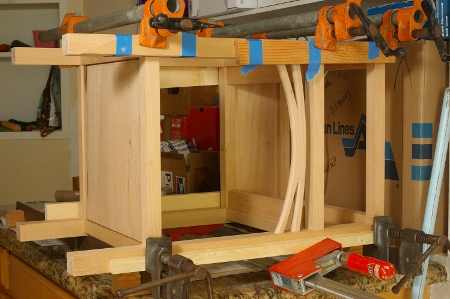
I started gluing up the base of the coffee table. There are four sides, and I decided to glue up all four separately to make sure that I got all of the pieces in the right spot. Here’s the first:
This is one of those instances where just laying the frame on top of the bench will suffice with the clamps in place. If there were some issue with the frames not being flat enough, I could always weight them to the benchtop (which is flat, of course), but that doesn’t seem to be a problem.
To aid glue-up, I made a little spacer block to jam in the sides to make sure that I get the correct offset for the little vertical stretchers:
This first one went well. The second one has a minor issue with the offset of the top stretcher. It should not really be a problem, but if it does, I’ll figure out some way to correct it. Hopefully the rest of the base will go smoothly. These tenons are very tight fits; it’s somewhat difficult to jam them into the right spots under glue-up time pressure.
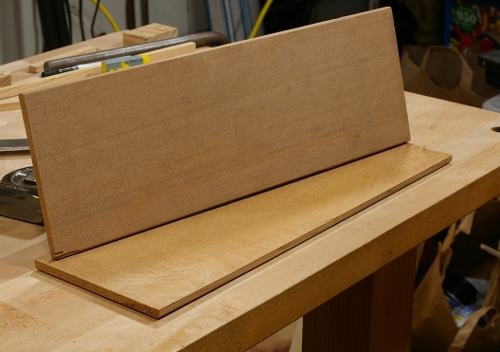
So this is getting somewhere. I’m also in the process of varnishing the top.
There isn’t a whole lot to say about this, but I finally got the top of the coffee table glued up:
Most things take longer than I would prefer, but this one was slightly more annoying because I was very close a month ago. Looking back, I can deduce that the delay occurred because I was just not satisfied with that one outlier of a board that I showed in the last post. That eventually caused me to go back to the lumberyard and get another board. Then I had to flatten and thickness that, as well as loathe all parts before, during, and after. I also rearranged the board order a few times before jointing. The new board replacement board isn’t a perfect match, but it’s much better than the previous. And the grain does not reverse.
The jointing wasn’t a joy either (it never is), but it’s done. Time to trim that up and do a final planing.
Work on the new nightstand projects has been excruciatingly slow this month, but has not stopped. In part, I’ve needed to do a lot of stock preparation and a lot of resawing (that’s the bandsaw calling me with its siren song again). The other problem is a lack of time–external stress causing most of it. But who cares about that? Let’s get into the woodworking.
I’ve been primarily working on the panels for the sides and backs of the cabinets. The sides are similar to the ones I’ve used before–1/4″ thick wood from the same stock (or similar) as the frame. There’s a slight difference, though: I decided that because I didn’t have any single piece of cherry wide enough to cover an entire side, I’d make a decorative touch with another species (birch) when gluing them up to make the piece.
The birch I picked was particularly annoying to work with, mainly because in many places, the grain reverses halfway through the width. Oh yeah, and it adores tearout.
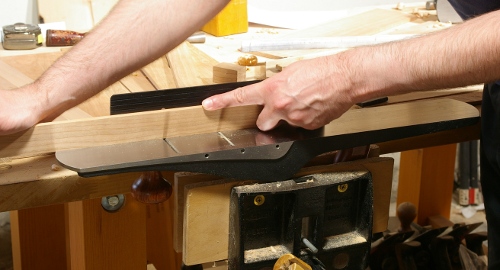
This time, I used the double-wedge method to secure the panel stock against dogs (my low-profile versions) as I was planing it:
The panel jointing/glue-ups gave me a chance to use my new Veritas bevel-up jointer with the fence. I’d already used it in this piece back with the shelves, but this operation was tricker because the stock is so thin (it tends to bend when you press it).
I cut pieces out of the stock as I needed them, first jointing one edge with a slight hollow, then sawing off the desired stock, then jointing again. This was not as simple as it sounds, because when you saw off a small strip, the strip often slightly changes in geometry, because it’s under tension. So the hollow that you had before on that one edge may now be a bit convex, and you have to redo that edge.
But the most annoying thing, by far and away, was that I couldn’t use the jointer fence on the now-thin strip as I did before, because the fence is too deep and I don’t have a workbench trick for that yet (though I might in the future). So I had to use the old “clamp the plane upside-down in the vise and pull the strip through” trick.
It works, but I’m not terribly fond of it. I’m always afraid of planing a knuckle, and you tend to get sweat on the plane sole, leading to rust if you’re not careful. Still, it was the only option I had at the time.
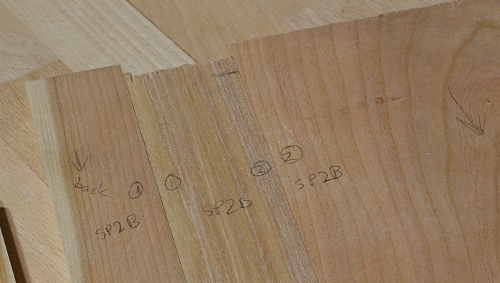
With that done, it was time for laying out the panel components and choosing which pieces would go on which panel. Some people use stroke marks or triangles to mark which pieces go where, but because I had 20 pieces, I decided to go with a more detailed system that told me which part went where, and which panel each piece ultimately belonged to.
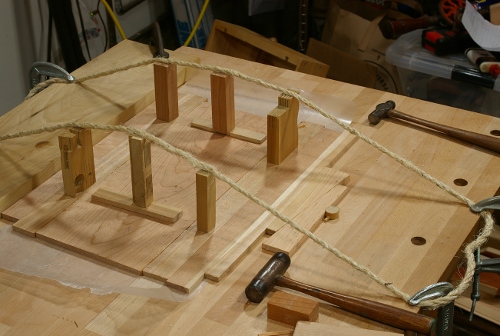
Now the fun part began: glue-up. There’s been a bit written about gluing up panels lately, and wouldn’t you know that The SchwarzThe Chris would post something just as I was doing mine. However, that method is for thicker stock. Plus, I was itching to try a variation on something I saw on page 20 of Toshio Odate’s shoji book.
Essentially, that method calls for you to sandwich the panel that you’re gluing between two boards, wrap a rope around the panel/boards, and put some blocks of wood underneath the rope to tension it and smash the panels between the boards to keep everything flat.
I modified it a little, making it sort of a hybrid with go-bars:
I used my workbench top instead of the board.
I didn’t use a board on top, but rather, just put the blocks directly onto the panel.
I used two sets of rope instead of one (one for each side of the panel)
Instead of using the rope to tension both on the top and the sides, I used it on the top only. For the sides, I used wedges, dog holes, and a stop on my workbench.
I put wax paper between the panel and the workbench to keep the panel from getting stuck to the benchtop.
It’s much easier to show this in a photo:
It took me a while to finalize the setup. I actually used a single piece of rope (twine, really) that I clamped to the bench in strategic places, and didn’t even cut it from its spool. I didn’t have scrap blocks handy, so I had to search all around the place for one of my boxes of scrap. And since I’d never done it before, I didn’t have a feeling for what the tension should be like and how everything fit together.
The good news is that once I figured it out, the actual glue-up process was a snap and took only a couple of minutes to execute. That’s important, because I had to do eight repetitions. (There are four panels, and each panel has five pieces, and hence four joints. I glued only two joints at a time to reduce complexity.)
Additional good news: it worked like a charm. Those panels came out really flat and seamless on the faces, and the wax paper did a perfect job at preventing the panel from sticking to the bench (and the paper). You have to replace the wax paper now and then because the wax coating comes off because it’s stuck to the glue.
I’m really happy with the results of the method and I’ll be trying it again. I’d struggled doing this sort of glue-up earlier because the panels are so thin. Being able to put the interim work into a spot where it won’t shift around is nice. I just hope that my experience with this time reduces the time it takes to set up next time (although part of that time was spent looking through boxes to find the rope).
I also acquired and resawed the stock for the backs of the nightstands. I picked up a bunch of “vertical grain” (quartersawn) western redcedar. It was so easy to resaw and plane–what a relief.
I guess there’s also this obligatory shot of this board’s grain (sorry to you folks on Google+, you’ve already seen these shots):
The other thing I’ve been doing on this project has been the decorations. I changed the design to be a little closer to the one I used on the first nightstand, to give it a little less transparency and eliminate the need for plinth on the bottoms of the sides:
With all of these components made, I’m nearly ready to glue up the main cabinets.
With the shelf made, the front and back frames glued and set for a few days, there was nothing left to do but to glue up the whole frame.
I never have many pictures of the glueup process, because it’s really the only time when time matters a lot. When you’re under pressure to get all of the parts into the right places and into the frame before the glue starts to set, there really isn’t any chance to take photos. In addition, all of my shots are done on a tripod and involve long exposures because the lighting is really bad in the shop, and I can’t hold the camera steady anyway. Finally, my hands tend to get a little sticky with the liquid hide glue, so I don’t want to get any of that on my camera.
I can, however, take pictures of the piece when I’m finished and it’s in the clamps. Thanks to Jasen for lending me the pipe clamps and K-clamp:
This will be ready for varnish in a few days.
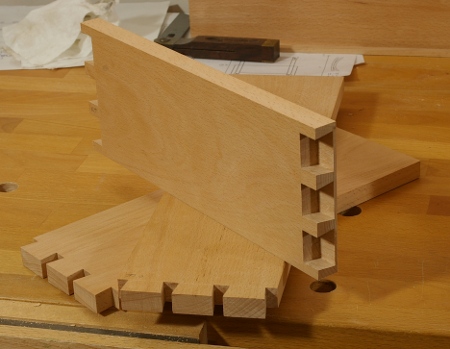
The two other remaining components of the project are the top and the drawer. I’ve got the boards for the drawer down to size and cut the half-blind dovetails for the front:
I’m a little concerned about the clearance in the front, it’s possible that this may be too tight of a fit. Depending on how it works out, I may knock off 1/32″ or less off of the faces of each side, because I don’t want this thing getting stuck inside the frame if the boards expand a little.
Though half of the joints are made for the drawer, I’m almost done, because the rear joints will be through dovetails, which are much faster to make. In addition, it’s likely that I will cut only two tails back there to keep it simple. Then there’s fitting the drawer bottom and finally, the drawer pull.
I may be finished cutting wood on the project this weekend.
I’m in the process of gluing up various components of the nightstand. I started with the rear panel, and actually did this with a rubbed joint (because I trust my rubbed joints enough to put them in a place where no one will see them).
The shelf on the bottom is made of two thicker pieces. I got out the clamps for this job, and it went about as well as it usually goes. My old bar clamps went underneath and I put a couple of F-clamps on the top. The bar clamps constantly fell over as I was working, as usual, and they’re really heavy, but eventually, I got the thing together.
Then it was time for the top, and a little voice in my head told me that if the bar clamps weren’t always falling over when I was trying to get stuff glued up, they might be a lot more pleasant to use. So I cut off a few sections of a 2×4 and made some stands. What a difference this made!
This took very little time to get set up and in place; because the screws to tighten the clamp are at the ends of the bars and free of obstruction, it was a piece of cake to swing the handles around. I also began to appreciate the impressive clamping power that these things have. The additional F-clamps I started with were the smaller, light-duty ones. Then I noticed that the bars on those were bowing a bit, so I switched to a heavier-duty clamp that was a little bit better (see above), but nothing like the bar clamps. It did not occur to me to use a couple of pipe clamps that I’m currently borrowing, sigh.
Let’s take a closer look at those clamp stands, made from a typical douglas-fir 2×4. You can tell that I really went all-out with the details on these. It’s funny how something so simple and cheap can make so much difference.
After going through all of this, I started wondering to myself how much it would cost to get a few more bar clamps, because I’ll be needing something to help out with other glue-ups in the future. Yikes, they sure do cost more than the $2 that these cost me. I guess I’ll be either borrowing clamps more or trawling more estate sales to get my fix.
While waiting for the glue to dry on my botched-mortise fixes, I broke the edges on the leg frame with sandpaper. I did this moderately, not taking off too much, but more than just a light touch.
Then I chamfered the edges of the top. The more I use the chamfer attachment to my Veritas low-angle block plane, the more I like it. It’s not the easiest thing in the world to control at first, but by taking light strokes (and starting at 1/4 to the end of the cut and working your way back as you would a moulding plane), it does a nice job. Not to mention that it has an adjustable mouth.
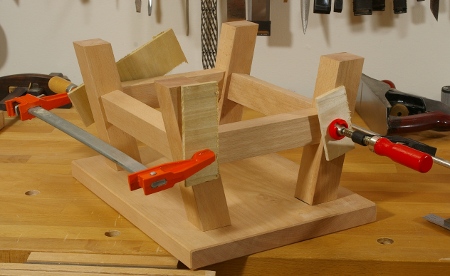
With no excuses left, I had to face the dreaded glue-up task. This part is always a little intimidating to me because you actually have to make sure that you get it done reasonably fast, and I normally like to work slowly. In addition, I’m even more clamp-challenged than most woodworkers.
One thing in particular that worried me was that my joints were very tight; it was difficult to insert and remove the parts without any glue. So how hard would it be to jam these things in?
So, from the preceding photo, you can not only see that I managed to get the joints together, but I needed only two clamps! The frame pieces went together like butter; it seems that the hide glue acted as a little bit of lubricant instead of being an impediment. The only time I really had to use some force was driving one of the legs all the way into the top. I called upon my mallet to do that.
I’m not even sure that these two clamps were necessary. The joints were really holding together tightly, perhaps because of the overall structure.