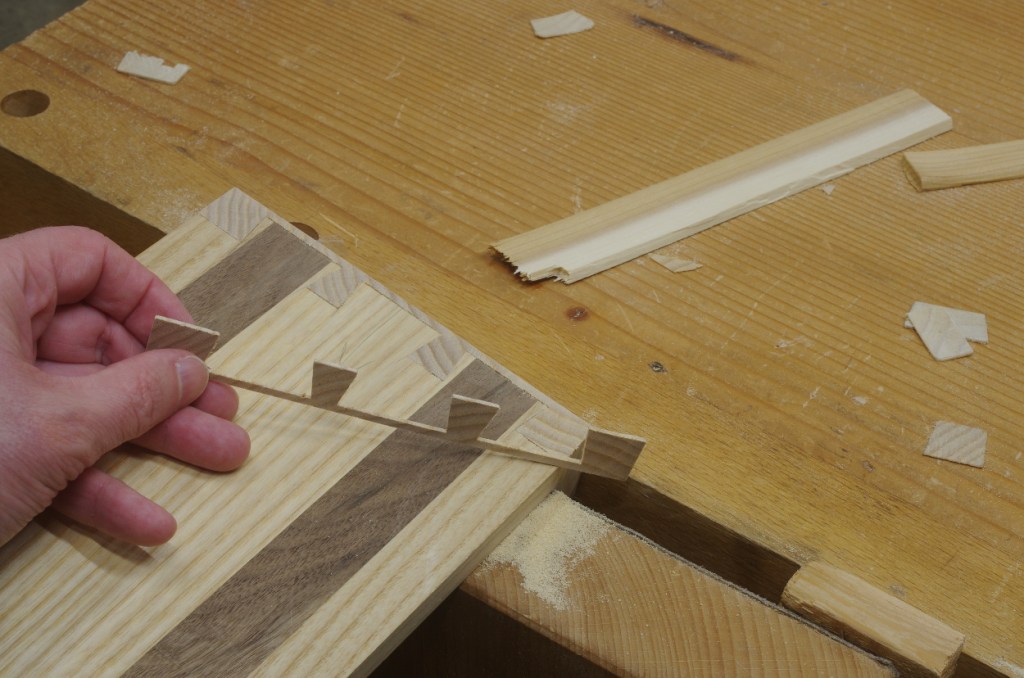
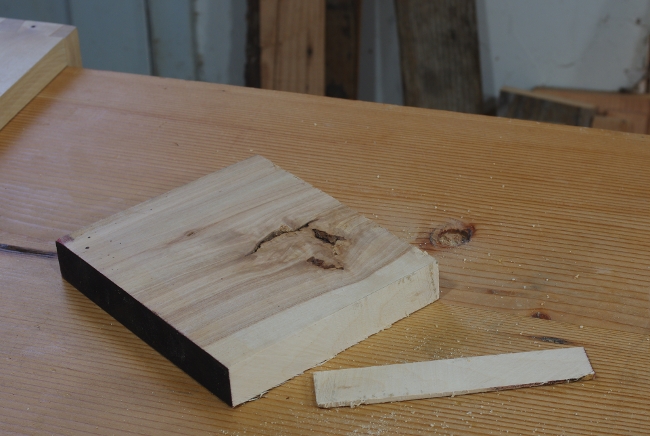
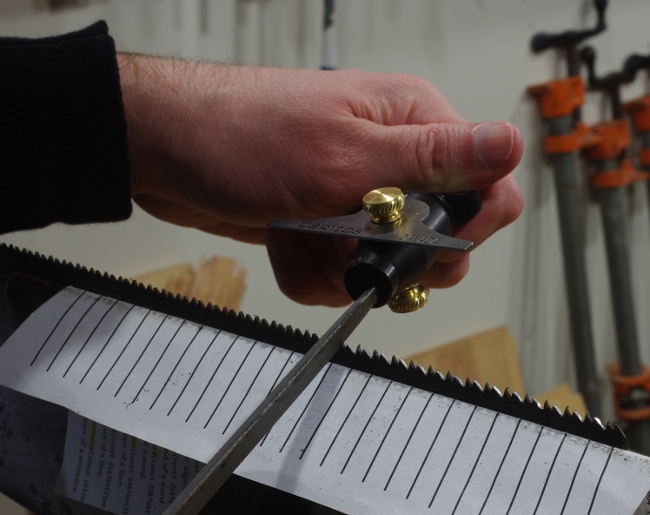
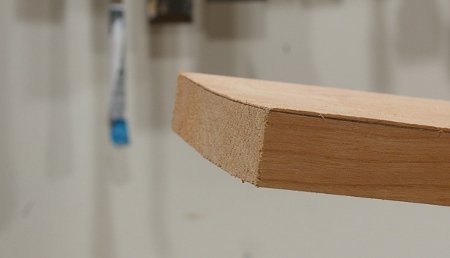
After gluing up almost any dovetails, you normally trim away the excess on the ends to make everything nice and flush. I make my half-blind dovetails especially proud so that I can get a really good kerf started next to my line. In the past, the main tool I used for trimming this stuff was my block plane. However, I picked up an inexpensive flush-cut saw at a home center in (hmm, I guess it was) Koto a year ago, and decided to try it out here:
This worked pretty well. If you’re not familiar with this kind of saw, it’s got no set (some have set on the top end only); the one I have is a little strange because it has teeth on both edges. I liked the way that this worked enough to go look for a better one the next time I’m in Japan. In any case, when you’re done, you can be left with some pretty amusing cutoffs if you’re doing half-blind dovetails:
(The photo above shows my original clamping method before I switched to clamp it down to the corner of the bench.)
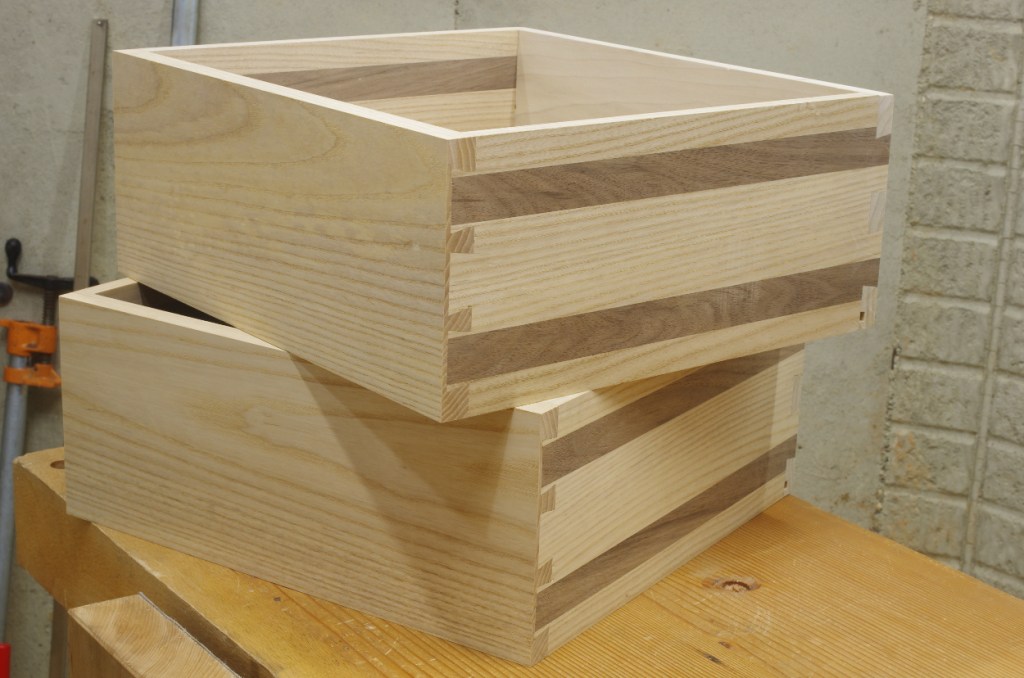
After sawing, you still need to give the ends a final planing, but it’s trivial at this point.
So the drawers are ready for finishing now:
In theory, the project is nearly done. The top has all of its coats of varnish and just needs to be rubbed out. The base needs a few more, and of course, these drawers need the most.
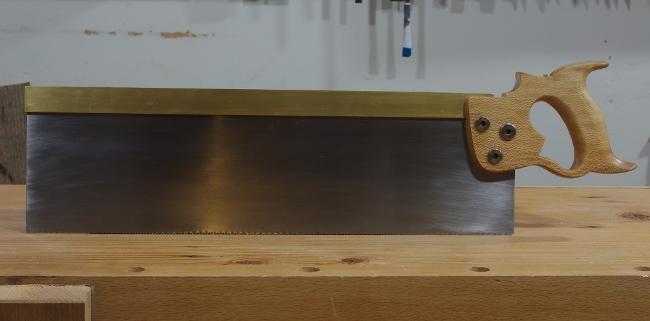
In my previous post, I briefly mentioned that I’d filed the plate of a new saw. I have now completed that saw; it’s a large tenon saw.
This particular project has been lagging for a long time. I’d gotten the plate and back from Mike Wenzloff several years ago, but they sat in a box for years. Finally, I filed the plate back in April. It’s 19″ long, and I filed it at 10TPI rip, with zero degrees of rake. Then it sat for a few more months until an informal gathering with some friends in June.
I decided to get started on the handle then. The wood is allegedly “Peruvian Pepper Tree” (Shinus molle); it comes from a piece that a local brought to a BAGathon several years ago and has been bouncing around several subsequent gatherings. I don’t really know if this is actually the wood here or not, but whatever; here’s a photo of the roughing-out process at my friend’s (awesome) shop:
(Later on in the day, I would get to use his Versa Vise. Very nice!)
This wood isn’t the worst thing I’ve ever worked, but it’s certainly got its quirks, namely wavy, reversing, interlocked grain (much to our amusement, as we initially tried to rive it with a froe). It’s about as hard as beech. I found it easiest to smooth it out with a scraper. Even then, I didn’t take a whole lot of care smoothing out the final surface, figuring that it would get dinged up anyway. (This hypothesis was quickly confirmed when I dropped it on the floor as I was just completing the rubout of the finish.)
I was initially going to use a Kenyon pattern for the handle, but decided on a Disston pattern at the last moment because I’ve been very happy with the comfort of the Disston-based patterns I’ve used in the past. I modernized certain parts (as I always do), but left this one mostly alone.
As usual, the finish is varnish. I used about five coats this time. The wood has some strange inclusions, but you can redefine those as “character.” Here’s a closeup of the completed handle.
The saw hardware is my usual (see herewhoops, cross-reference broken for now). Here’s the whole saw:
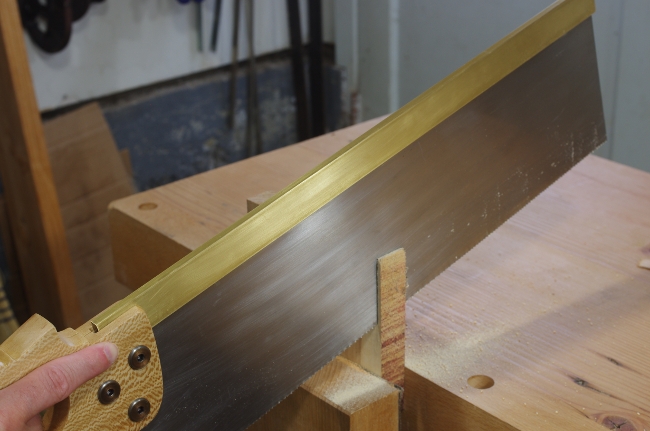
All of this is fine and good, but does the saw work? I picked up a piece of the wood that I like to hate the most (some really hard birch), and checked to see if it could saw straight and quickly:
Hey, it wasn’t so bad at all. I came to my senses and switched to a bench hook to finish off this test cut:
Then I tried it on some less horrible woods. It slices through yellow-poplar like butter.
So it’s done. It would have been nice to have had this saw for the big tenons on the workbench project last year, but that’s the way it goes.
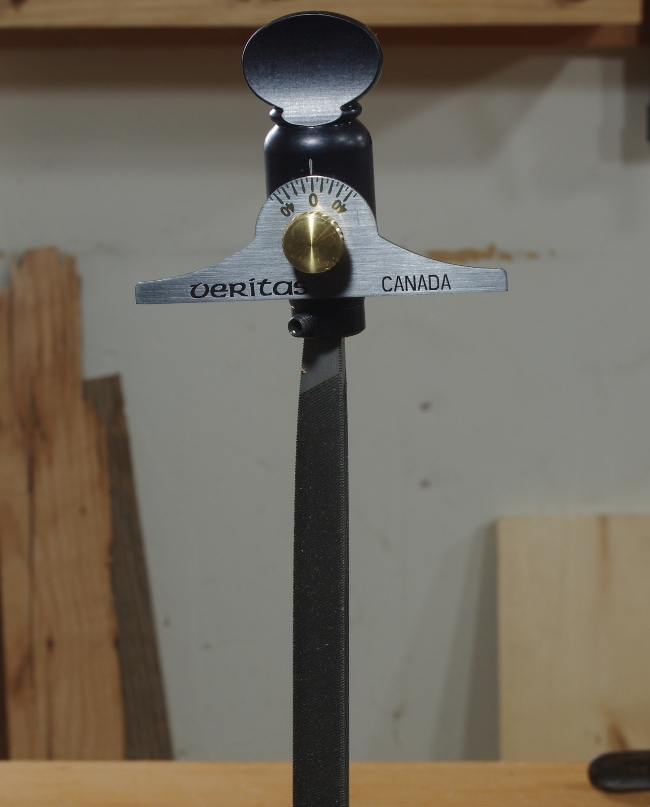
It’s been saw season around here lately. A few months ago, Lee Valley introduced their saw filing holder (or as I like to call it, “a doo-hickey that you put on the end of the file”). I bought one almost as soon as it came out. Unfortunately, an injury to my finger (not induced by woodworking) and other matters have kept me from doing much in the shop this year. However, I did get a chance recently and because I had a number of saws that needed help, I thought I’d start there.
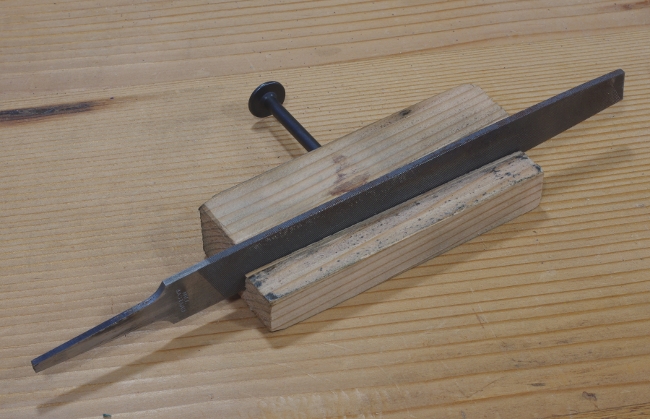
Strangely, the last thing I did in the shop in the previous year was also to sharpen a pair of saws that ended up in Ethan’s workshop in Taiwan. I did those with the old “block of wood on the end of the file” method. For those, I also made myself a quick-and-dirty saw jointer:
This is another one of those things I should have done a long time ago. It took maybe 20 minutes.
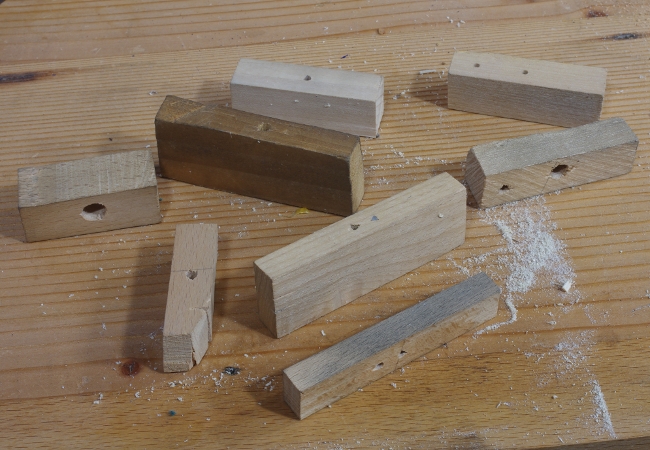
Now, the only real reason that I bought the Veritas holder was being fed up with the million little saw file blocks that accumulate over time:
Not only do those blocks take up a lot of space when I’m not using them, but it’s hard to keep the angles consistent on both sides, and trying to keep track of them all is irritating.
The first saw I worked on was a small crosscut saw for a friend. I said that I would do this saw last year and thought I’d better get it out of my queue first. This saw also featured another first: The first time I ever hammered out a kink in a saw. I’m amazed that it worked. Then I jointed and shaped the teeth. The shaping was the first time I used the handle, and because I just used it straight across to establish a halfway decent tooth geometry, there isn’t much to write about other than that it seemed reasonably comfortable.
Then I set the teeth. Here’s another departure from the norm. I’ve been using a Millers Falls saw set for a long time, and although it works fine, it’s a little uncomfortable to use for a long period. I thought about a replacement such as the famed Stanley 42X, but that has the same kind of grip as the MF. For whatever reason, I decided that I’d try to figure out a Disston Triumph saw set (Stephen Shepherd has written about them here):
It turns out that these things are not bad at all. It’s got the height and depth adjustments that you want on a set, and has a little “gripper” to grab the saw plate just before the plunger presses the tooth into the anvil. One size doesn’t seem to fit all, though; the plunger on the one I have is much too wide for fine-tooth saws (there are smaller versions, and I think you could file down the plunger, too).
With the set done, I could apply a final light jointing, and sharpen the teeth:
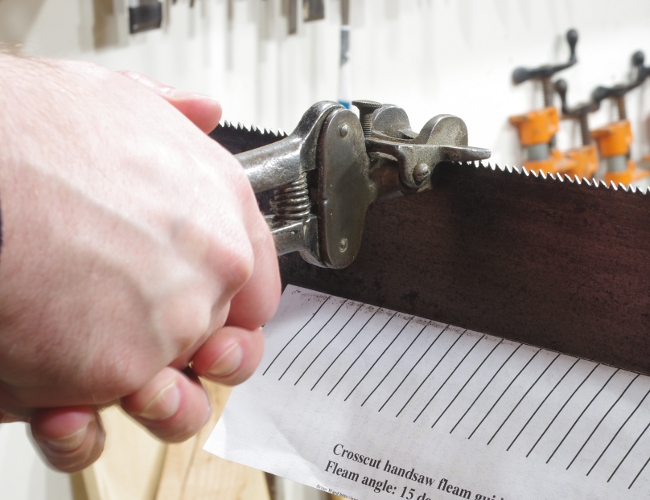
The Veritas handle was still reasonably comfortable, but now that I was filing to create fleam and sloped gullets, I noticed that the rake angle setting on the handle was really no longer realistic (the protractor that sets the fleam angle guide was slightly better, but read on). So instead of trying to figure out the correct angle, I just placed the file in the gullet with the fleam and slope that I wanted, and rotated the rake angle setting until the protractor guide was parallel to the saw. However, I did take note of the rake angle setting that resulted on the file holder, because I reversed it when I filed the second half of the teeth from the other side.
The resulting saw worked as well as any I’ve filed before:
Of course, it only worked well once I glued the beautiful apple handle back together after I’d cracked it trying to take the picture above (sigh).
The next saw to work on was a new rip saw that I had on my list for a while. A while back, I had found yet another Disston No. 7 with quite a lot of blade left (but not in the greatest of shape rust-wise). After removing the rust and waxing the blade, I set about making the large teeth by removing every other tooth, converting a 7TPI saw into a 3.5TPI saw. I was a little worried about setting this saw, because I might be trying to bend every other back against its original set, and that could break a tooth. But it turned out that once I’d filed out all of the new teeth, there wasn’t much set remaining anyway, so it worked out fine:
It was during the filing of this saw that I determined that the Veritas handle was helping me file a little faster. This had nothing to do with the angle adjustments. It was because I could pull the file with my left hand as I was pushing with my right. This was possible because the file holder grips the file tightly (as opposed to the block of wood, which does not). It made a difference on this saw because there really was quite a lot to file away to create the new teeth.
But I also determined that you really do have to take the measurements on the saw file holder with a grain of salt and make adjustments as necessary. The large teeth on this saw require a large file, and this is what it looks like when the file holder is on the end:
Because there’s an increased taper at the end of the file, the file holder grips slightly askew from the file’s line. So if you want to keep this file perpendicular to the saw plate by using the protractor, you have to adjust the protractor off the zero mark. There is less of an effect on smaller files, but it’s still there.
In the end, I don’t think this matters much. It would be a tricky (but not impossible) engineering problem to fix it, but the worst part would be an additional adjustment on the handle that would be far more confusing than the ones already there.
The third saw that I filed was my Winchester crosscut saw. I did not need to shape the teeth because I wasn’t starting from scratch. I lightly jointed the saw, set the file holder angles by eye for the first half of the saw, then reversed the angles for the other half. It went quickly.
I also used the filing handle on a fourth saw, a brand new one. That one isn’t finished yet; I’ll post when it is.
A summary regarding the Veritas file handle is as follows: I don’t think that the accuracy of the rake and fleam angle measurements are important. Consistency is more important, and it works fine for that, but not any better than a paper fleam guide and blocks of wood (and remember that practice trumps all). It also won’t help you with the most important part of saw filing: keeping the tooth height uniform (just use a jointer; if you want to throw even more money at them, Lee Valley can sell you one).
For me, it does what I want it to do. There are no more blocks of wood cluttering my saw sharpening supplies, and it’s fairly comfortable to grip. The extra force that I can apply to the file stroke when shaping new teeth is a welcome bonus.
It’s time to get down to that new workbench. Everyone and their uncle is building a Roubo this year. Consequently, I’ll just be another voice in the din of people blogging about their Roubo builds, but hey, I’ll have a new workbench at the end.
I got the first pieces of wood for this project late last year. A fellow BAG has a pretty serious quantity of reclaimed douglas-fir sitting around and was gracious enough to offer it my way (thanks Bill!). This is big stuff–basically 4x12s and 4x14s supposedly taken from a warehouse. Reclaimed douglas-fir has many advantages, but two of the biggest are that it’s quite hard (yet easy to plane), and it’s really, really stable.
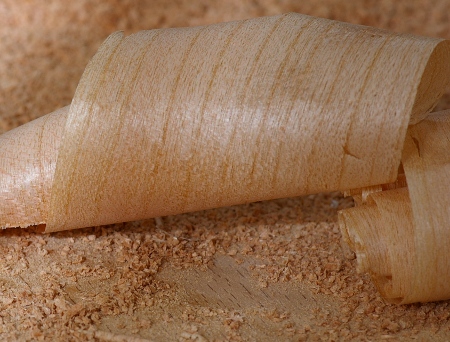
The boardstimbers had a layer of cruft on the faces, consisting of oxidization, dirt, and who-knows-what. After cutting roughly to length, I sawed off the crud. That process looked like this:
I’ve decided that I will do this project completely by hand, just so that I can say that I didn’t wimp out with a bandsaw (or something of that sort of masochistic nature). Freakishly-looking disembodied arm aside, I’ve been doing all of the heavy-duty ripping like this, and it’s really not that bad (Remember how I mentioned that reclaimed douglas-fir is really stable? That helps). The timber is held steady by the front vise of my current bench.
Getting rid of the grime this way yields funny cruft veneer:
I could probably sell this stuff to an artist.
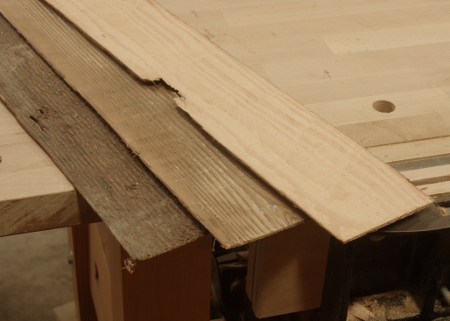
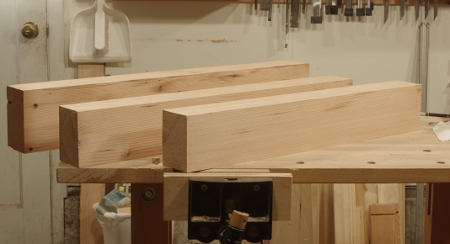
So after sawing, I finished sizing up everything with the usual cast of planes. With the wood I had on hand, I got three major components of the base: two legs (front and middle) and a stretcher (rear):
The plan for the legs is 5″x3.5″ and the stretchers will be 6″x3.5″. I won’t be thicknessing the stretchers precisely because there’s no need. You can tell how the scale compares to my current bench from the preceding photo.
And now I’m out of wood, at least for big stuff. Time to get another load!
[edit: It planes easily, but as I learned later, this wood dulls plane blades very quickly.]
It’s been five years since I made my first post on this blog. At that time, it was on Livejournal, and I was doing it just because it seemed like a good idea at the time. Apparently, I’m still posting, so because it’s been a nice “even” number of years since I started, I figure I ought to do a review post because I have nothing better to do.
(You won’t see too many of these posts on this blog, so bear with me.)
Before starting, I should mention something about the name of the blog. It doesn’t mean anything. It was just something that rolled off my tongue. It is a dippy name, it’s difficult to remember, and I’ve always been open to changing it. Unfortunately, I couldn’t think of anything better at the time, and that condition persists to this day.
The first post is my introduction, but perhaps there’s a little more that I can add to it. At that point, I had never done anything resembling semi-advanced woodworking. In hindsight, this was a natural time for me to start because I’d finally gotten some measure of stability in my life after years of grad school, moving across the country, working in crazy environments, and living in cramped places. I’d moved into that particular San Francisco apartment not too long before. It was nice and roomy, I lived alone, and I finally had some extra time. Sure, I’d like to have started earlier in life. I didn’t, so there’s no point in thinking about that.
Regarding tools: I don’t know what was going on in my mind, but I must have been researching old tools quite a bit. For example, how did I know that I needed to sharpen my own saws at that time? My initial tool list wasn’t too far-off. I still haven’t bought a shoulder plane unless you want to count the mini Veritas version. And although I have a miter box, I haven’t used it (I haven’t even sharpened the saw). But I had one special tool right-on, and that was the Winchester handsaw I’d picked up (but never used) in 2003, three years before starting. It was a long time before I actually sharpened that thing, but ever since, it’s really been one of my favorite tools.
That a very common style of saw is special to me may provide some insight into the type of woodworking that I like to do now. I feel that I went after too many planes in the beginning, and did not realize the amount of work that saws do. In time, I began to appreciate saws more and more, and even made a few of my own.
I thought that I would be very project-oriented when I first started. I had the idea to make bookshelves–perhaps I believed that I’d make them within a year? I was wrong. I still haven’t made a set of bookshelves (I did make a prototype). What I did instead was learn the process of milling wood and basic joints. The first larger thing that I put together was my workbench, followed by tools such as my mallet and scrub plane.
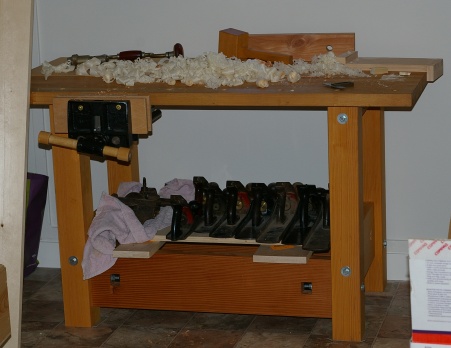
But about a year and a half into the process, I slowly made a dovetailed box, and that got things rolling. Though I didn’t have much time to work on it, that box went together more smoothly than I expected, and I still use it. By this time, things were changing in my life, and soon enough, I moved from the apartment to a house that actually had room for a shop. I spent the first few months trying to get organized there:
Then I started to build projects in earnest. The first big one was the shoe rack, which took some time but ultimately was a success. That was followed by the prototype bookshelf, the stool, and the first nightstand–I did all three of those projects in less than a year. At the same time, I made some shop improvements such as the saw till.
Incidentally, I switched the blog to the galoototron.com domain about a half-year after I moved to this shop. It was September 2009, and this shoe rack post was the first on the new domain. Before the switch, no one other than some family and friends knew about the blog, but then I started to tell a few more people (such as Luke Townsley at unpluggedshop.com) about it. Suddenly a lot more people than I really ever expected were reading this thing. That’s about as far as I ever went to promote it, though, and I don’t have plans to change that. I do appreciate all of the comments that I get from fellow woodworkers.
In retrospect, the two years I had in that shop were pivotal. I went from dorking around with tools and wood on a somewhat irregular basis to building projects. I gained speed and confidence in my joinery. The shop itself had a lot to do with this. No longer did I have to be completely fastidious about cleaning up after each session–I could leave a small amount of shavings or sawdust on the floor and it didn’t matter. Because I had enough room, I could put down my work at any time and pick it up again whenever I had the chance. This helped me establish a work pattern; I’d come home from work and have fun with a project for as little as 10 minutes or as much as an hour and a half before finishing for the day. I could even do a little in the morning before I went to work.
Of the projects I built in that shop, the nightstand seems like an obvious choice for a favorite, and it is. However, the little stool is a co-favorite:
The nightstand was the last project I completed there. Then, in the span of a few months, life got really busy, and after that, I moved again.
The new place also had room for a shop but it was more “raw”–as part of a garage, I really had to work to define the space. The old shop had room for me to put tools on tables all over the place. It was mostly disorganized, but I sort of knew where everything was, so I managed. There was no room for that in the new shop. To make up for it, I was allowed to hang cabinets, racks, and hooks on the walls and ceiling to my heart’s desire.
Unfortunately, I wasn’t able to get the new shop organized quickly enough for my taste. Part of this was a chicken-and-egg problem; the tool cabinet is an example of this. My first task in the new shop was to get some of the tools on the walls, and I had to finish the cabinet so that I could put tools in there. Unfortunately, my tools were all packed away in boxes (from the move) that surrounded the workbench. I really had no idea where anything in particular was and I didn’t have places to put them temporarily.
At the same time, I also had more furniture to make. The second nightstand project kicked off this year, and it turned out to be far more complicated and time-consuming than I expected. (And I’m still working on it, but I’m almost done.)
Every now and then, I add to the wall storage in the shop. That situation isn’t fully resolved (see below), but it is much better. Things are getting done, and I have to say that I prefer the new shop to the old one.
Also, I’m making a concerted effort to work out some of the annoying little stumbling blocks that I have to deal with from time to time. The two biggest problems I come across are tool and project storage (both temporary and permanent) and workholding. I have plans to solve those soon.
Going forward with projects, I have a long list in front of me. The most pressing, according to those in the know, is an entertainment center. We’re also looking at the rest of the living room–coffee table, bookshelves, who knows what. With the exception of our couch, the living room furniture is crap and it makes sense to concentrate on that room. Whatever I do, I’ve decided that I’m not going to make anything as brutally complicated as the second nightstand project(s) for a while.
But then again, I may just make more complicated things. Here’s how.
The title of this blog is no lie. Everything I do is by hand, and that includes stock preparation. I didn’t go down this road out of principle or some other similarly silly reason. I did it primarily out of interest and necessity–the apartment I once lived in was no place for power tools.
Unfortunately, it turns out that flattening, thicknessing, and resawing by hand is a lot of work. A large majority of my time and effort goes into stock preparation. That’s not even mentioning how much time I spend sharpening plane blades as I go. It’s getting out of hand. I can flatten a board quickly now (and wow am I glad I learned), resawing isn’t so incredibly horrible when you keep your saw blade sharp, but that last step of getting down to final thickness is totally bogus when you have to repeat it dozens of times, even with my scrub plane that can take off 1/16″ at a time.
So I think I’m going to get myself a stupid lunchbox-style thickness planer sometime in the new year. I’ll continue to flatten stuff by hand–it’s a great way to get to know the wood and the board that you’re about to use–but when it comes to getting that other side down to something reasonable, I won’t think twice about feeding it to a machine. I’ve got furniture to build and I do not have the time to lollygag.
However, the blog remains the same. The preceding paragraph (I hope) will be the only mention. I don’t plan to write about it when it happens, and I’ll continue to do all joinery by hand.
At this point, it would be remiss not to mention that I’ve had help. Schwarz says that the modern woodworker works alone and I think he’s wrong. Even if one never meets another woodworker in person, and even if one never takes part on a discussion forum online, the modern woodworker has an incredible resource mass available. It’s sometimes easy to overlook that a person wrote what’s on your screen, and when you learn something from someone, that person is very much with you in spirit as you work.
And wow, have a lot of people been working with me in spirit in my shop. There are just too many to list, but I’d really like to thank anyone who’s written anything that I’ve learned from or even read.
Also, there are the BAGs (Bay Area Galoots). Several of you have really helped me out in more direct ways–lending me tools, giving advice, being generally cool, that sort of thing.
Now, back to the work on the new nightstand projects. Progress has been (inexplicably) made.
When you’re resawing by hand, there is a big consideration in determining how difficult it’s going to be: Under how much stress is the wood? There are two big factors that I’ve noticed:
The cut of the wood
Moisture content
Let’s start with the moisture content, because that’s perhaps a little easier to understand. Green wood is usually under a lot less internal stress than dry stuff because that’s more or less its natural state before being cut down. As R. Bruce Hoadley’s book explained, you can cut slices off of a fresh log and it won’t crack apart until it starts to lose moisture. Sure, there might be pitch, resin, sap, or whatever else inside to make it more difficult to cut, but it does mean that the wood will be less likely to close up on you.
Because I rarely get the chance to work with green wood, the cut of dry wood is what causes me the most grief. Dry wood is always under stress of some sort; it’s unavoidable because you’ve taken away the water that was maintaining equilibrium when it was (probably) a stable, living organism. What you want is another state of equilibrium where the lignin is strong enough to hold everything together without cracking. Quartersawn wood is great because it’s under the least stress–because it’s got a consistent density pattern across the cut, it dries evenly and doesn’t tend to cup. Just a little more shrinkage at one end is pretty easy to handle.
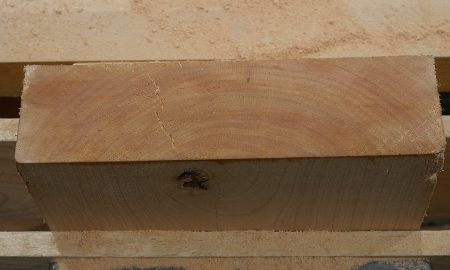
Well, that’s nice, except that quartersawn wood is more expensive and it’s a lot harder to find than flatsawn stuff (not to mention that the figure may not be what you’re looking for). So this is the sort of thing I usually end up with:
This is a cross-section the 8/4 stock for the new nightstands that I wrote about earlier. The wood on the bottom that’s closest to the pith (center) is under a lot of stress. You can see a minor check here–this was due to that knot and its proximity to the end of the board.
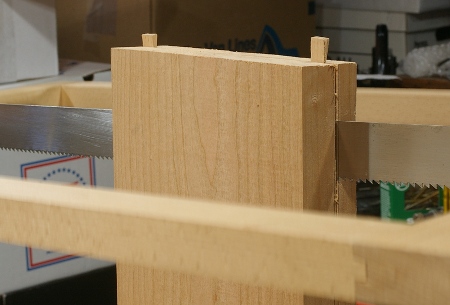
You can see that this board was fed through a planer a little after drying because the cross-section across the cut is flat. But below is what happens when you resaw it:
That pencil line (and the sawcut) was straight when I started, but as I got further into the cut, the stress along that cross-section was relieved slightly, and this cupping was the new state of equilibrium.
The problem is that this stress relief is a major pain in the tuchus when you’re resawing dry flatsawn stock by hand. Basically, some part of the wood inevitably closes up around your saw as you are sawing, and you find your saw incredibly hard to push or pull through the cut, especially if you’re using a deep-bladed affair such as a Disston handsaw. It’s less severe with a frame saw, but it’s still there.
To work around it, break out your wedges and keep tapping them in as you’re working:
They’ll keep the kerf from closing in around you and it will be easier to saw. You really want to put them in as soon as you can, because the easier you saw, the straighter your cut will be. If your blade is pinched by the wood, it is being bowed out of a straight line, and your cut will wander.
Wedges are easy, except for one minor detail. You mostly want to be working like a bandsaw, perpendicular to the grain. However, when working with a fairly thin blade such as this, you need to be able to establish a shallow kerf in both sides so that your blade can track inside. To get these small kerfs, you need to tilt the saw at a diagonal, and this is precisely where the wedges and/or stress-relieved wood will get in your way. If you pop out a wedge or if you’re not able to drive them in deep enough, the wood will close up around your blade.
So what you often end up doing is tilting the saw just a little and establishing a small kerf until you can get deeper.
A bandsaw arguably does this better, because it always cuts perpendicular to the grain because you’ve got a fence, and the blade will always be cutting next to some (hopefully) straight wood. But that’s not to say that the wood isn’t under stress and isn’t closing around the wood–it is, and that’s why you’ll hear a POP at the end of a particularly nasty cut. You need a fairly beefy bandsaw to resaw wide flatsawn stock. You can cheat a little with wedges by turning the machine off in mid-cut, banging some wedges in, and resuming, but this is to be avoided if at all posssible…
As far as the current project goes, I’ve chosen to cut the thinner slice from the more stressed parts of the wood, the “pith” side. The result is that the thicker slice, having a more consistent density, mostly retains its straight profile, but the thin slice (shown above) cups like crazy. My plan is to make those thin slices into panels, where I can use their more interesting figure to my advantage, and not care about their increased instability, because they will be flexible and slide in grooves.
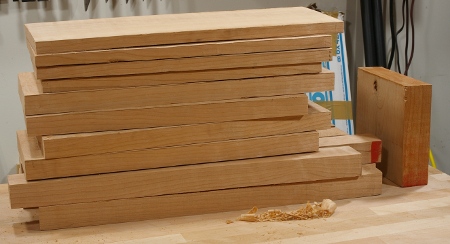
That said, here is what became of that 8/4 piece of cherry in an intermediate state (the chunk on the right is what remained at the end and I probably won’t use it):
It’s hard to believe how large that board used to seem, and now it’s so much more compact. The crazy thing is though it’s not much different in volume (I was actually efficient at slicing this for a change), it seems like it’s a reasonable weight now, whereas before, it was really unwieldy. Of course, there will be a significant change in volume when I whittle those panels down to desired thickness.
Eh, whatever. What it boils down to is that I’ve got my new project frames right there! There are a few more notes I have for how I chose to cut this, but I’ll save them for a later post.
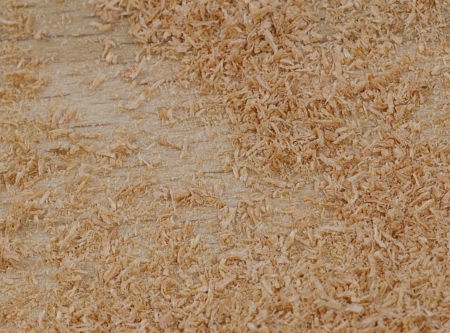
I’m not terribly interested in photographing sawdust and shavings as an art form, but I was interested in doing it because I wanted to see if my saws were really doing things the way they were supposed to. Being in the ever-so-fun milling stage of the nightstand 2 projects, I’ve made a lot of sawdust so far.
During my last project, I noticed that my carcase saw is not cutting quite as well as it used to, and that it can even occasionally bind in the kerf if I’m not careful. It still works pretty well after about three years since I first shaped and sharpened the teeth, though.
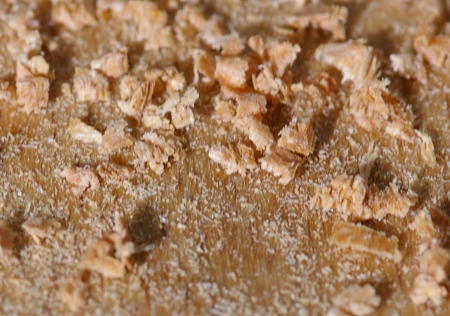
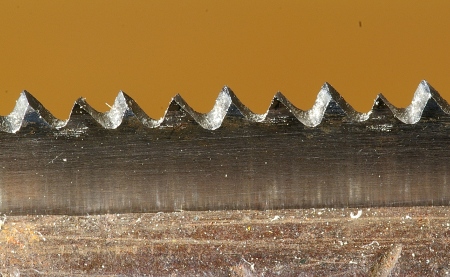
Independently, I decided to finally get a macro lens, and like the nerd that I am, I thought I would point it at the saw teeth to see what they look like (since these are too small for me to really want to strain my eyes on):
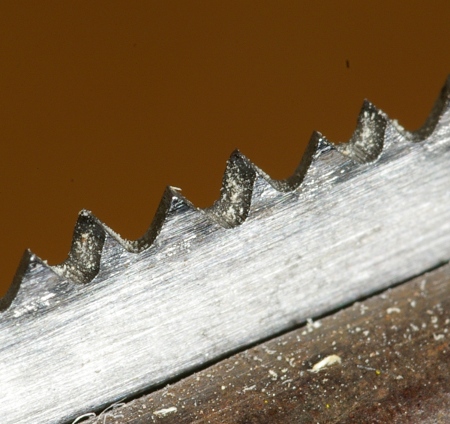
Remember that this is a 14TPI saw, so the area shown here is a little more than a half-inch wide. The image here translates to roughly 8x magnification on a 100dpi display. Here’s a view from an angle:
You can see that a few of the tips have gotten the slightest bit rounded. I will need to resharpen this soon, though I think I’ll take it through the next project first. It will be interesting to see how this looks when I do so, because this was basically only the second crosscut saw I ever sharpened, and I have a much finer file now.
I’m almost tempted to get a new plate and back from Mike Wenzloff, like I did for my recent joinery saw, because it would be heavier and thinner. But I don’t think I want to mess around with making new saws for now. I should at least put together that big backsaw whose parts are currently waiting for me. Oh, did I mention that I fell victim to the miter box syndrome? I’m not sure what to do about that, either.
I learned a lot of stuff when I was in Taiwan during this past trip. For example, there’s a Taiwanese douglas-fir!
It’s supposedly pretty rare. But rather than expand on how much I like douglas-fir, let’s talk about one of the little trips we took.
The Luodong Forestry Culture Garden is a relatively new combination park and museum. Luodong was a busy hub of activity for logging in the early 20th century, and this park represents the elements that comprised the industry.
The log pond, fed by a natural spring, was a storage facility for logs. Today, you can find a kingfisher perched on the driftwood if you look closely:
It is also the location of the terminus of the former narrow-gauge logging railway, including several museum and workshop buildings, six steam locomotives, and rolling stock that were in use on the line.
Such large-scale logging was made possible the by the railway. The Japanese had attained much experience at rail construction by the end of the 19th century. Now in control of Taiwan, they were quite interested in its vast forest resources, and completed the Yilan line (from Taipei) in 1924, though logging operations were well underway before this time. Luodong is where the narrow-gauge line met the Yilan main line, and the park is the site of the station.
Below, you can see a partial reconstruction of a ramp that was used to roll the logs into the pond:
There’s a photo in one of the buildings that shows a larger-scale ramp. That white speck to the right of the log is a person. These are big logs–we’ll see more of that later.
The forests are located in the mountains, which are quite rugged in Taiwan. One method used to get logs off the hill was the slide (notice the large sculpture in the rear; there are several at the park):
The sled was used for dragging logs across horizontal surfaces where the railway didn’t go:
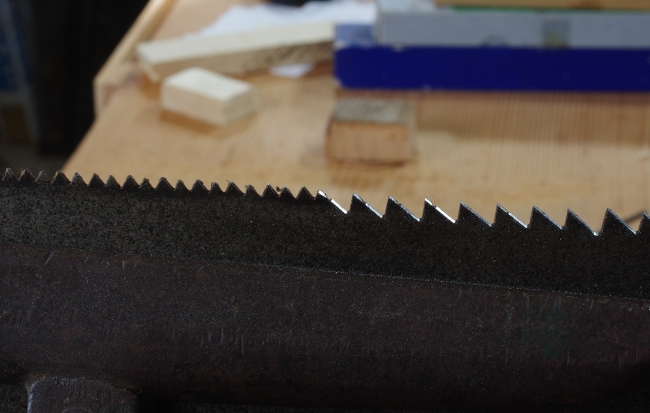
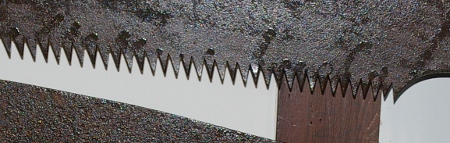
So far, it was an interesting place, all right. But then, in the Forestry Exhibition Hall, we hit galoot pay dirt. It took a lot of self-restraint to refrain from jumping up and down like a kid in a candy shop upon seeing this:
I’d been wanting to see one of those large saws for a long time. It was as large as I expected, but one thing that took me by surprise was just how big the handle was. Compare the handle size with the one below it–this sawyer must have had large hands. Another interesting note is that the larger teeth don’t end in points; they’re flat at the top. I would suppose that this is to provide extra strength.
The labels say 大剖鋸, for big rip saw. Below, there are a few more saws, including some crosscut saws, with the label 五齒孔鋸, meaning five-tooth hole saw. Basically, that means there are five teeth, then a gullet for raking out the sawdust.
Check out the rake angle of second saw! The saw below the large one also featured progressive rake along with the progressive pitch commonly found on a saw of this type. Here’s a close-up–the rake changes from positive to negative.
In this building, there was a timeline of when various operations were done by hand versus machine. Doofus that I am, I didn’t take a photo of it; all I can say is that I was surprised at how long things were done entirely by hand, even ripping logs into boards. It was well, well into the 20th century.
Also included in the display is a handy diagram of how the tools are used. There are no surprises here–the hewing axe (鉞斧) is used for hewing, the crosscut saw is used for crosscutting, and the big rip saw is used for ripping:
Now, you might think that the log above might be a little large for that fellow to handle. That is, until you get to the “mountain life building” and you see a photo of this veritable he-man getting to work:
Notice how he has a second, smaller saw at his side. I’d guess that he started the cut with this thing. What’s particularly fascinating about the way these guys worked and their saws is that they could do it as a single-man operation–no pit saw needed, no pit needed! It’s remarkable how the saw did not need to be wider than the log. I’m going to speculate that they’d saw from one side, then the other, then back, all the way down the log.
There is “DIY” building in the park where they apparently let people mess around with wood and tools, but it was closed when we went there. Too bad.
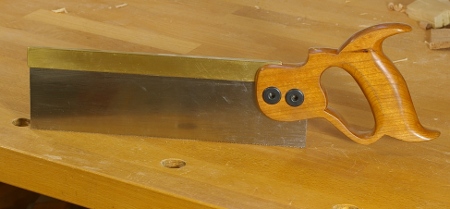
In my last post, I was cutting the teeth on a new saw. This one’s got a plate that’s 10″x3″, .020″ thick, and has a milled brass back that has a 1/4″x3/4″ profile. These parts came from Mike Wenzloff, to whom I owe a lot of thanks for not only accommodating what turned out to be kind of a crazy order, but also for providing tips on how to attach the back and other matters.
I’m not sure what to call this saw because it’s somewhere between a dovetail saw and a carcase/small tenon saw. As I mentioned before, it’s got 16 teeth per inch, which is in the range of most dovetail saws, as is the sawplate thickness, but its plate depth is a bit more than more of those.
My goal was to replace the trusty Crown gents saw that I’ve been making most of my joints with. I’ve been happy with the way that saw cuts, and indeed, I’ve made most of my furniture with it, but I wanted more weight and a “nicer” handle. So since I want to cut most of my joinery with this saw, I’m calling it a joinery saw, I guess.
So with the teeth cut, the back shaped and attached, and the blade waxed up, I grabbed the cherry handle from this saw from before, put holes in the right spots, and it was done:
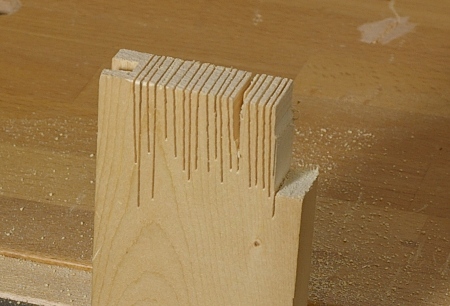
Then I tested it out by slicing the end of a piece of something-or-other to ribbons:
I have to admit, that was a lot of fun.
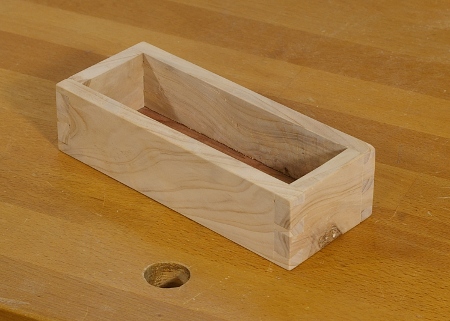
But projects awaited this saw, so I had to get going on them. The first one I worked on was this box:
It’s a small box meant to hold cards the size of index cards. The walls are made from a block of Arizona Cypress (thanks to Roger Van Maren for bringing this in to Bagathon!), about 3/8″ thick. The bottom is redwood, about 3/32″ thick, sawed out with the frame saw.
I’m not sure what in the world I was thinking, because this wood kind of “crumbles out” rather than tears out. The grain reverses like crazy. I had to make a scratch stock-like tool to scrape out the groove for the bottom. But I guess once you get the hang of it, the end result is nice. And the new saw worked really well for those teeny dovetails.