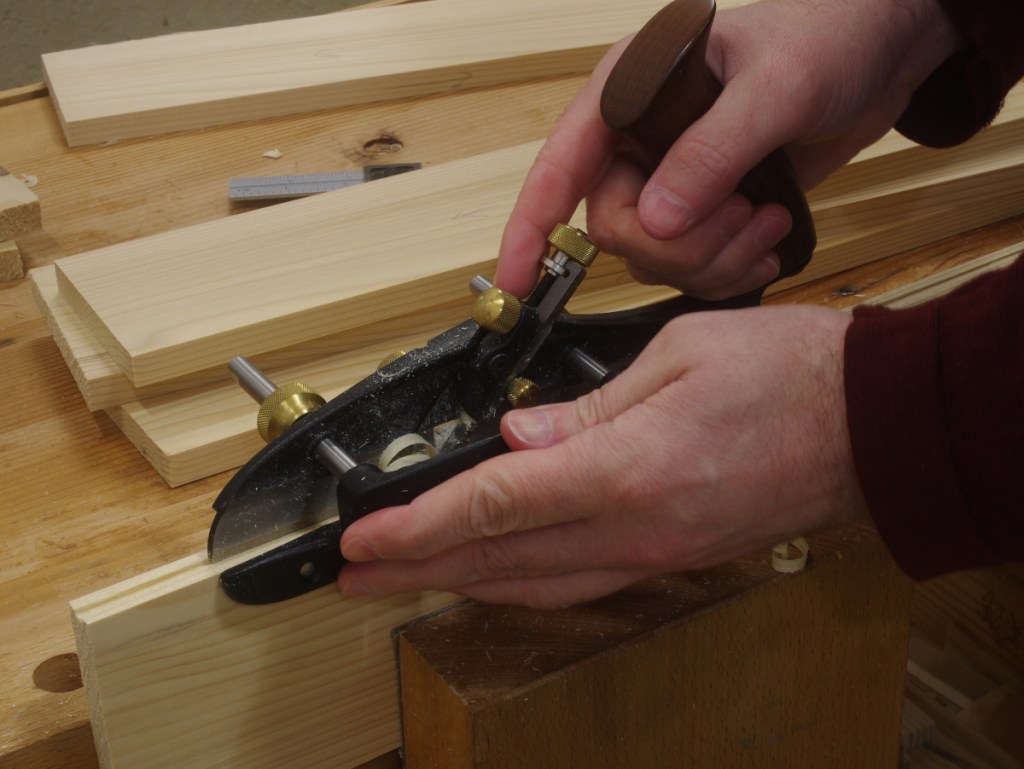
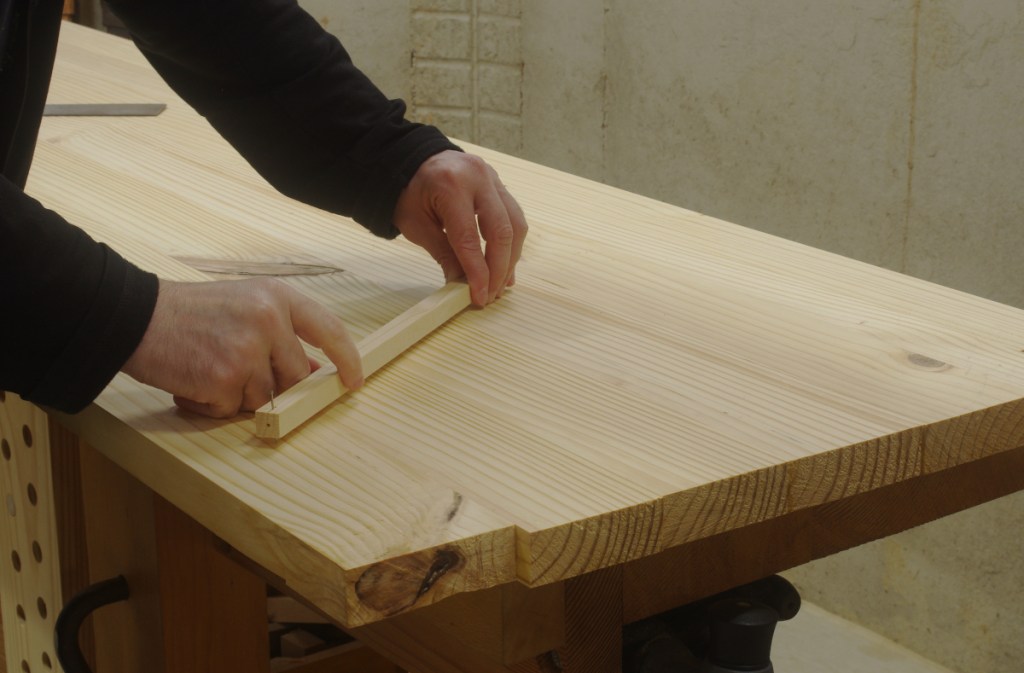
In my small chest build, I started working on the bottom. This is usually done with a series of tongue-and-groove or shiplap joints. I prefer tongue-and-groove, but although I do have a set of match planes (and a Stanley 45), they are for 1/4″ grooves, and I’m working with stock where 3/16″ would be more appropriate.
Match planes are great for pumping out a lot of tongue-and-groove joints. To do it at almost the same speed, I could spend $30 on the Veritas tongue-cutter for my plow plane in that size. But none of this is necessary, and I didn’t feel like waiting around for that cutter to arrive anyway. So I set out to do it with the plow plane. Doing so requires three cuts instead of the two that you’d need to do with match planes; the tongue is nothing other than two rabbets.
You start by plowing the groove side, which is the same no matter what:
It’s best to plow all of the grooves at the same time, so that you don’t have to constantly readjust your plane.
Then, with the groove side still up, adjust the fence so that the cutter sits right on top of the “outer” side of the groove (the side opposite the fence), with the sides of the blade and groove flush:
This is where I have to say that I really like the Veritas small plow. I could do this with my Stanley #45, but moving and locking down the fence on that thing is finicky and difficult to do with precision.
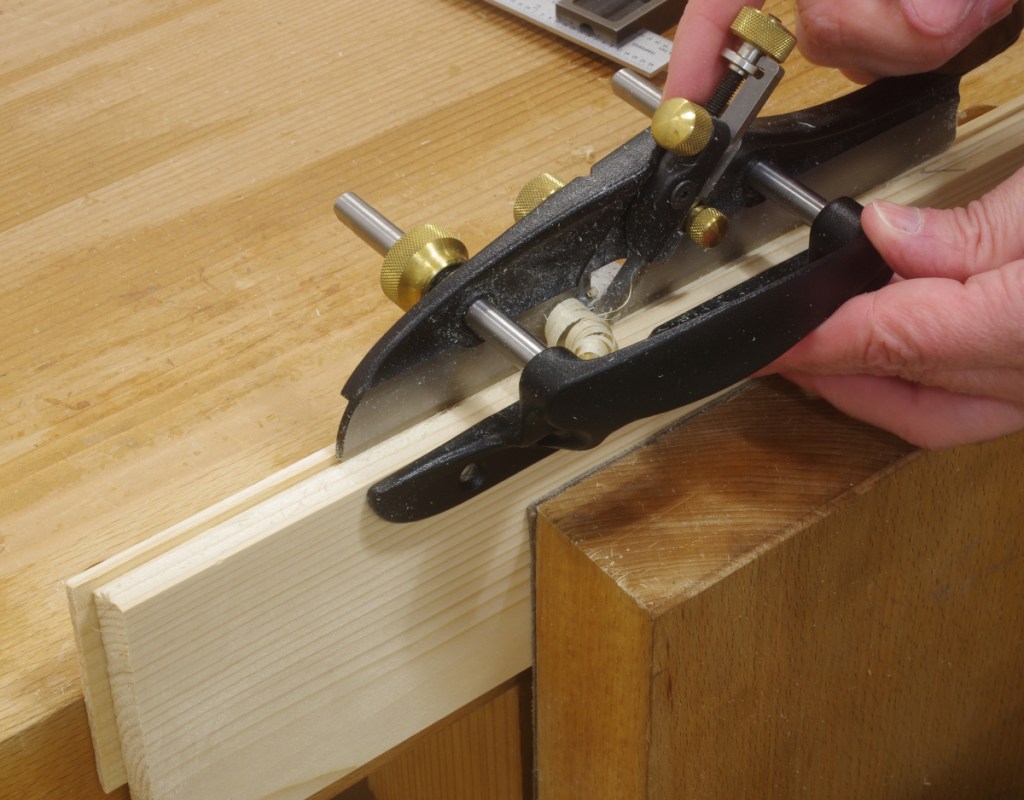
Now, flip to your tongue side of a board, and (here’s the important part) clamp a scrap to the side that you’re going to cut, flush to the top. Then cut this side of the tongue:
The reason for the scrap is so that your depth stop (which is usually on the side opposite the fence) has something to hit when the cut is complete. Yes, I made the mistake of forgetting to do this on my first attempt.
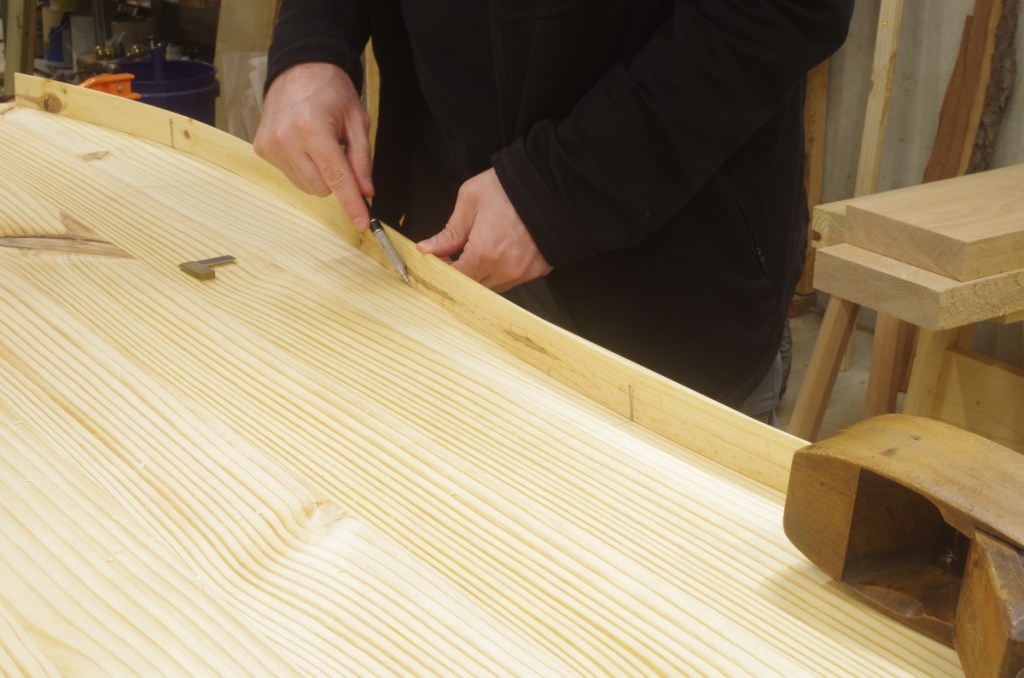
Again, it’s best to cut all of your boards at the same time. Then, put a board’s groove side up again, and set the fence so that the cutter rests on the “inner” side, like you did before:
This one is more difficult to see, so feel free to use any optical method of cheating that comes to mind.
Then flip back to the tongue side, and cut this second rabbet that makes the tongue:
You probably won’t need to include the scrap this time, because the depth stop should register against the tongue itself.
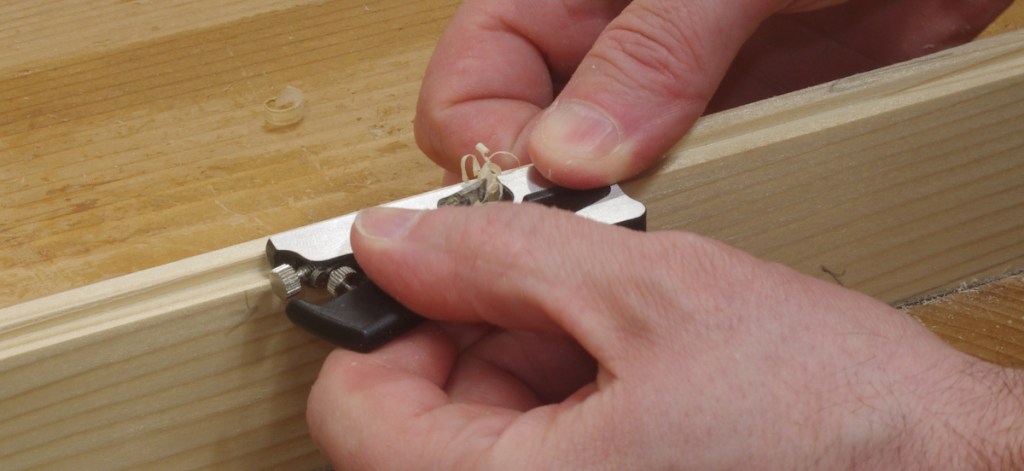
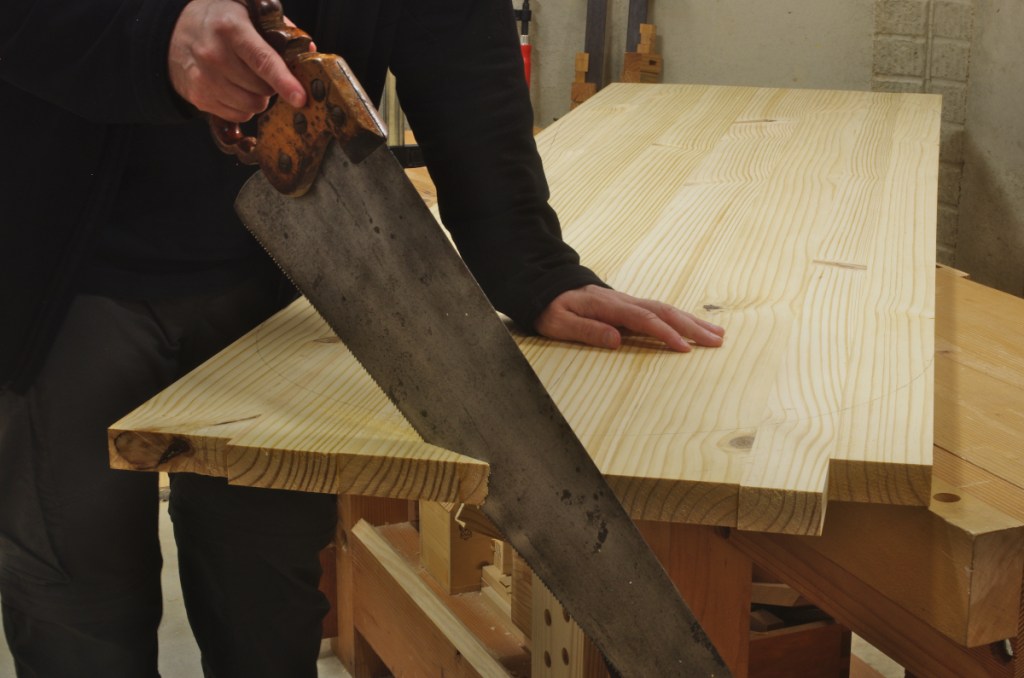
It’s possible that you might feel that the fit is too tight when you’re done. In that case, just adjust the “inner” side with a rabbet plane. I’m using my miniature shoulder plane because I recently said that I seldom use it, and I feel guilty for that. Or something.
If you’ve got a lot of these to make, one possible time-saver is to reset the fence to the trimmed side after you adjust the first tongue.
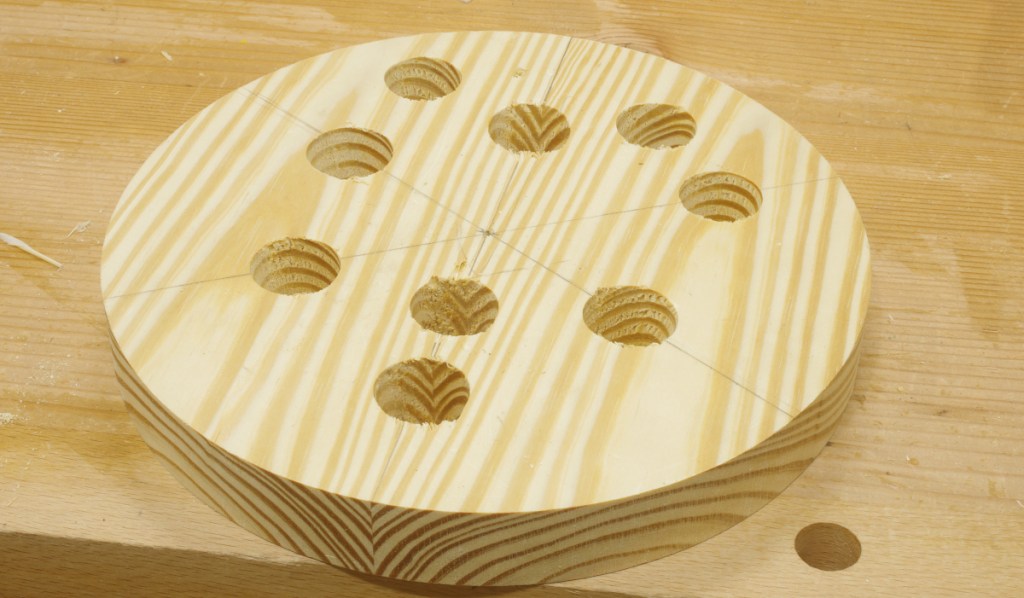
That’s more or less it. And I now have everything ready for the bottom of my small chest:
My next project is a scaled-down down version of the traditional English tool chest, for use in my office as a place to store the junk that always seems to pile up on my desk. Call it “The Conformist’s Doodad Chest” or whatever. Though it will resemble the original form, let me be clear: I don’t intend to use it for tools. It’s not big enough for that purpose, at least not for woodworking. It’s half the length of the ATC as originally published, but has only 1/6th the volume. The stock I’m using isn’t quite as thick; it’s not intended to be beat around a shop.
Coincidentally, Joe just finished a tool chest about the same size, of which he will be detailing the build process soon.
As I was preparing the stock for the shell, I realized that I probably ought to make a new shooting board because I was doing stupid improvised stuff like this:
I started on the shooting board, but it will be a topic for another day, maybe.
You have to make a lot of dovetails for these chests, and I used my new bench-on-bench to make them. So far, so good, and I soon had the sides of the chest made:
I glued them up yesterday, so now I have the shell with untrimmed dovetail ends:
That scribbling reads “flat (enough).”
Now, I suppose that since I have to make a bunch of skirts and tills and stuff, it’s time to stop kicking the shooting board can down the road.
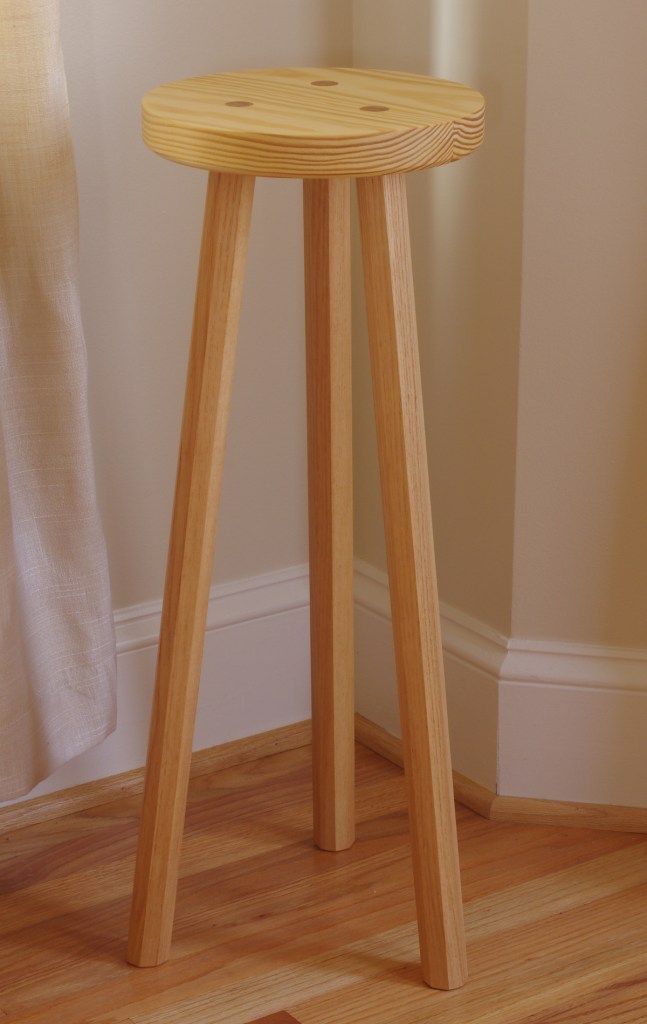
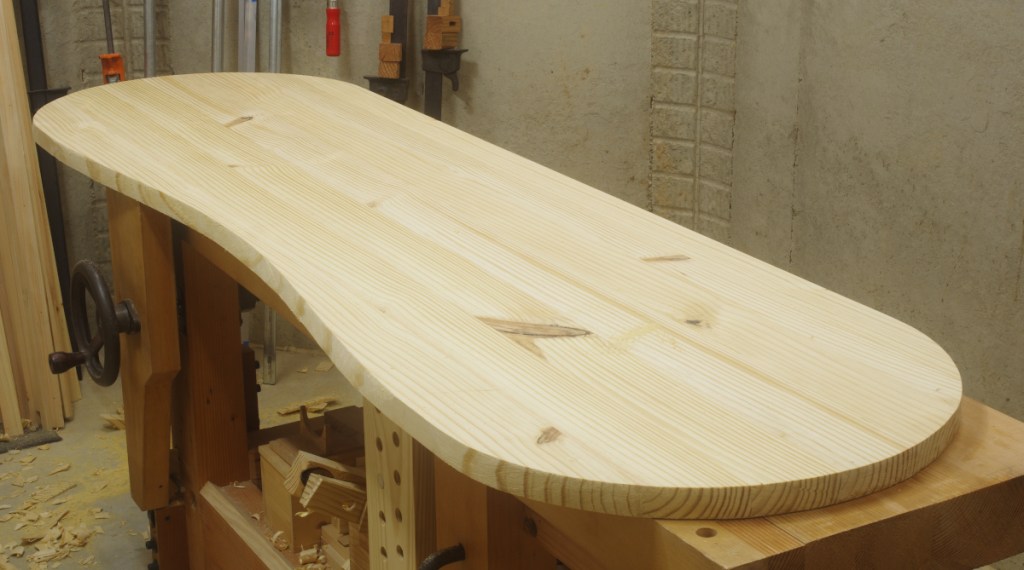
Several months ago, as I was starting the daybed project, I also decided to do another project in parallel: a stand for some decorative object that’s to go in the living room. I figured that it wouldn’t take much time; it would have three tapered-tenon legs, so all I needed to do was make a quick model to figure out what angles would be appropriate, and just do a little work.
I’d already made the model (leading to this). For the top, I glued up a really nice chunk of yellow pine and sawed it into a disc on the bandsaw. I made the legs and the tapered tenons on those. So all I had to do was ream the mortises and I was as good as done. Shouldn’t take more than a few days, right?
That’s when disaster occurred. For the life of me, I couldn’t keep the angle consistent when reaming with the brace. I failed immediately, reaming too far on the first one. Having ruined the top, I figured that I could learn just what I did wrong, so I tried the other two. I failed at those as well. Then I just tried a bunch more and failed at all of them by hand:
I was just having too much trouble controlling the reamer. It wobbled too much in the brace, and I couldn’t feel anything. Furthermore, because this is on the thin side, I was having trouble making adjustments without overcompensating. If I were more experienced, I might have been able to do it. Then I tried with a power drill. I was able to do some decently using that.
Sitting back, I wondered what I could do about this situation. I’d speculated before that I suspected that the reamer I was using was just meant to go into a chuck on a power tool, and this reinforced it.
Note: Chris Schwarz says in an old post that this “standard” reamer, sold by Lee Valley, is made in Canada and fits well in a brace. The former is NOT true (maybe it was back then), and as for the latter… maybe it fits better in a Spofford brace? I dunno. The shank is very soft, which caused me a lot of trouble in the brace.
What to do? I figured that I had four options:
Use a handheld power drill to do it.
Make the “banjo jig” to do it on my drill press.
See if I would have better results with a reamer with a square-taper shank that’s meant to go into a brace.
Sulk.
Door number four is never a bad choice, and I did a fair amount of that (especially considering how nicely the rings were arranged in the glue-up of the top that I ruined), so I thought, well, I’ve never really been too comfortable with my power drill; I’m don’t have the steadiest hands. Perhaps I could make the banjo jig?
But I also thought, well, I like hand work, and I don’t like the idea of another jig lying around. Maybe I could be lame and blame the tool, try a different reamer, one with a square-taper shank? I ordered the Veritas “Pro” Reamer. It was on backorder for a week or so. That became a few weeks. Then the expected date was shifted to January. This was not a cause for optimism. Much sulking ensued. But just as I was thinking, okay, well, time to build the banjo jig, mine shipped around the end of November.
To make a long story short, I am far happier with this reamer. Other than the proper shank, there are two things in particular that I like: First, there is a single blade, which seems to make it easier to control with a brace. Second, the blade is adjustable: You can set how much it protrudes (different amounts for different woods), and you can adjust the included angle slightly with set screws.
Great. My first “genius” idea was that maybe I’d try to use the thing in my T-handle in the “inline handle” configuration (or whatever it’s called; it’s the configuration on the right):
That worked, but it was really slow. So I first went at it with my largest-sweep brace:
This was quite effective. I was able to get down to near the depth I wanted quickly and at the correct resultant angle. I admit that I did switch back over to the T-handle when almost done to go more slowly when finishing up, but I think I probably didn’t need to do that.
Then it was time to chamfer the bottom edge. It’s weird to do that a curved surface. C.S. did this on a similar project in the ADB with the bandsaw, and I probably should have done that as well. Instead, I first went at it with a block plane chamfer attachment, which did not work terribly well, but got me to a certain point. Then I made this stupid thing to go the rest of the way:
It’s essentially an adjustable chamfer block with a piece of sandpaper clamped down at the bottom. This worked, but not very quickly. It loads up too much. I think it would have gone much faster with 60-grit paper instead of the 110-grit here, but eh. This might work really well with a milled-tooth file wedged down in there. I think I know how to do that, but have no need right now.
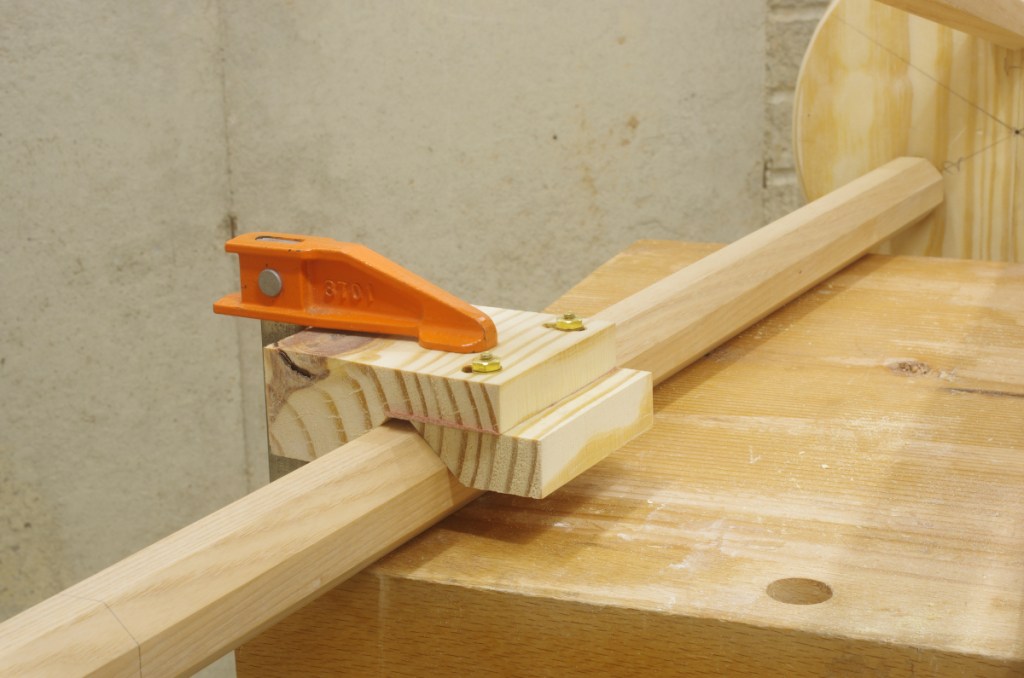
In any case, it got done. I glued and wedged in the legs next. This left me with the final cutting task: getting the legs to length. I marked them with the “slide block of wood with pencil taped on” method, but then I needed a good way to clamp the octagonal legs to the bench to actually saw them. I was thinking about making some kind of custom caul, and then I just grabbed the above stupid tool and clamped with that:
It was far more effective at this task, so the futility was diminished somewhat.
After sanding, I finished it with tung oil. Here it is in its intended location, without the object that will sit on top:
Aside from the top being southern yellow pine, the legs are ash; one of them was seen in this post. A project that I thought would get me a few quick XP instead dragged on without much action for a couple of months. At least I no longer need to sulk over this one.
Additional: I have a plan for that initial ruined top. I do not know when I’ll be able to act on it.
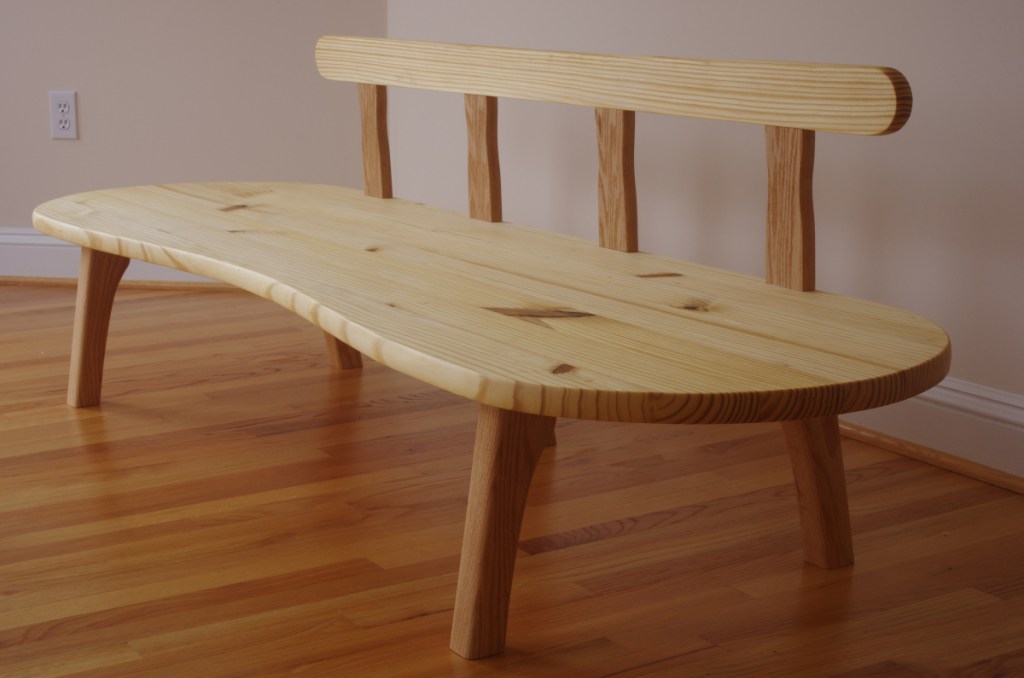
The only remaining task after gluing in the daybed legs was to glue in the railing, which brought us to this point:
It’s hard to notice, but the rail has a slight concavity on top, to echo off the front of the platform.
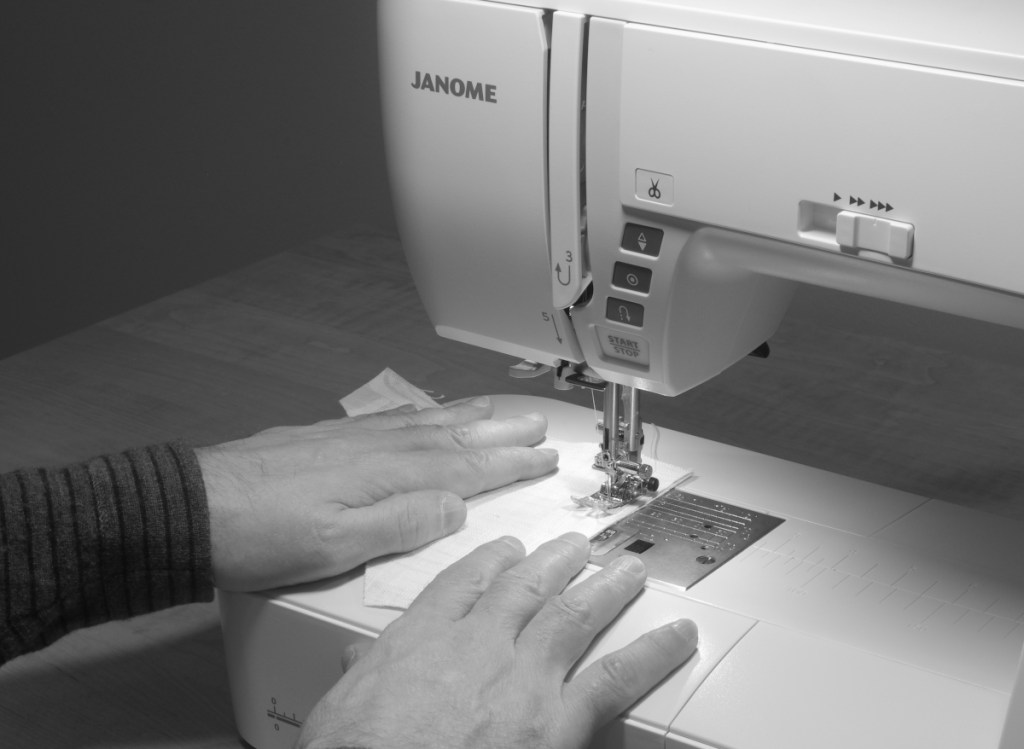
Well, that’s all fine and good, but almost no one wants to lounge around on a slab of wood, right? I haven’t really mentioned anything about the cushions, except that I’d finished them. I don’t have any photos of that process. It’s not exactly woodworking, and I don’t approach sewing projects in the same way that I do woodworking. So you’ll just have to settle for me sewing together two scraps of the cushion fabric:
Grayscale to make it look more “old-timey-looking,” when in reality, I was just too lazy to deal with the white balance down there.
Levity aside, I’d like to thank The Funky Little Chair for making a great video showing how to make cushions. I’ve never done anything like that before.
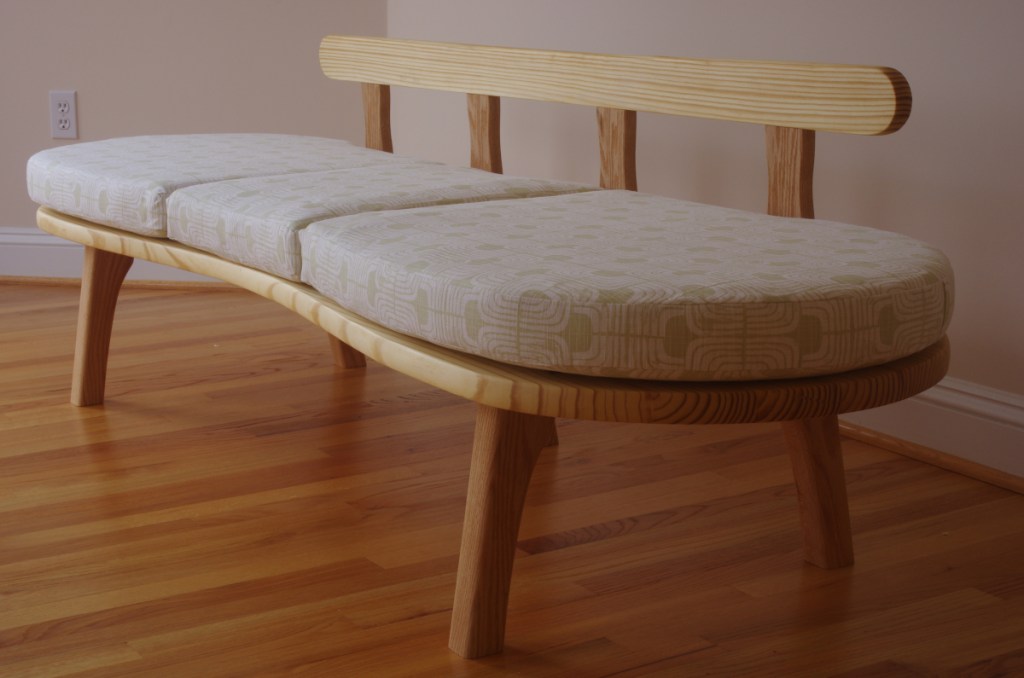
I could have made my life easier if I’d done square cushions first instead of a curved thing with weird little cutouts in the back. But I managed, so here’s the final piece:
Strangely, even though I’d only made a very rough drawing of this before starting, it came out almost exactly as I envisioned it. That doesn’t seem like it should happen very often.
To recap, this is southern yellow pine with red oak legs and railing supports. The raw material cost wasn’t terribly high; I think the foam might have been the biggest single-ticket item. The main problem with materials is finding what you want. The wood is one thing, but if you’ve never shopped for fabric before (while trying to get your spouse to agree on a selection), there’s a whole new world of fun waiting.
All of that fussing around with making those clamps has finally gotten me ready to get started in earnest on my next project: a daybed/”couch”-like thing for an area of the house that currently has zero furniture. I had a sort of “vision” about how I wanted it to appear one day, and knew that I had to build it before someone else in the house bought one, because what I imagined seemed pretty neat, at least at the time. And when I read what Roubo had to say about them (yes, it’s in there), I became more convinced.
I wanted this to go a lot more quickly, but getting the large platform glued up took much longer than I had wanted–I had to make a whole bunch of stuff, including the clamps, before I could get to where I am now.
The first operation on the glued-up platform (after planing it off) was to shape it. I started with the ends, which are to be semicircular. I don’t have any trammel points to make a beam compass for such a large radius, so I just drove a couple of small nails into a board at the appropriate distance and used that to scribe it out:
As made, the radius of this improvised beam compass was a little too much, but to correct it, I just tapped one of the nails to bend it inward. I marked over the scribe line with a pencil.
Then there was a curve to lay out on the front. I guess I’ve been watching too much “Tally Ho,” because I tried to imitate Leo’s curve marking with a batten tacked into place:
I wasn’t sure if this would work, but it did. There were a few options for curve shape, mostly dealing with the tangent angle at the point of inflection in the middle. I chose a fairly mild one.
So I had one side done, and to do the other, I traced that side’s lines onto some of the paper that I use for making patterns, then cut along the lines on the paper, flipped it over, and transferred the lines to the other side of the platform.
Then it was time to start removing wood. I always get a little nervous the first time I cut into a panel (especially one that I’ve spent so much effort on gluing up), but it had to be done:
I removed as much as I could with a saw, working my way around the ends and trying to get as close as possible to the line. The cuts on the long grain were more challenging, so I used a drawknife to get rid of most of that material:
I finished the initial shaping with my Shinto saw rasp, and had this:
The front curve was somewhat tricky because it’s concave; I sawed a relief cut in the center and took out most of the waste with the drawknife and a chisel. (Note: Southern yellow pine is not particularly easy to use a drawknife on, but there’s worse.)
It came out as planned. Pay no attention to the ugly knots in the middle; those will not be visible with a cushion on top. I would have preferred clear wood, but due to multiple factors (the proximity of the nearest source of large southern yellow pine, the inconveniences of the source at the time that I went to buy it, not to mention the obnoxious process of picking through the pile alone on a steamy hot day in the middle of a pandemic), I settled for straight, mostly-quartersawn boards that would yield a clear perimeter, which is the only part of the wood that will be visible.
There isn’t much remaining work on the wood to do. I have to make the legs and the railing, do the final profile of the edge, and finish it. During finishing, I’ll make the cushion (hopefully I’ll have some sort of an idea about what I’m doing there).
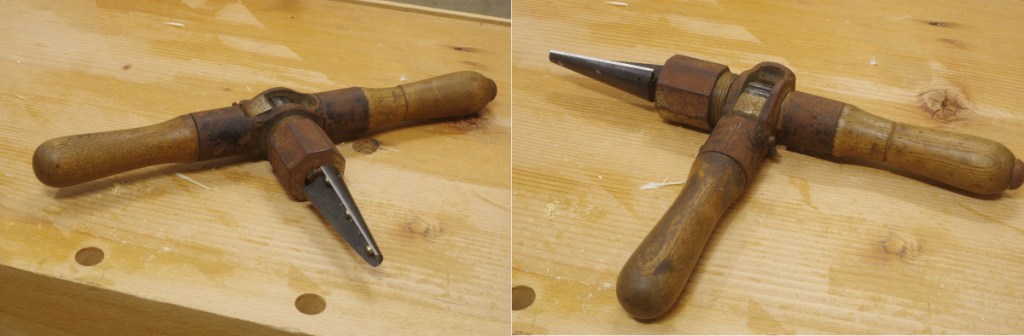
My plans today were to get the legs onto the stand that I’m building. Things did not quite go according to plan. The first impediment was that I haven’t been too content with the way you use the tenon cutter, and it came to a head today. I prefer to twist the stock into the cutter rather than twist the cutter around because it’s easier to keep it centered that way. Unfortunately, it’s not really easy to put the tenon cutter into a vise or something to keep it put. Not like it’s easy to twist the cutter, either, mind you.
So I picked up a squared-up ash cutoff, put a rabbet into one edge, and screwed the tenon cutter into the opposite edge (it has holes and little half-moonish registration standoffs to help with the attachment):
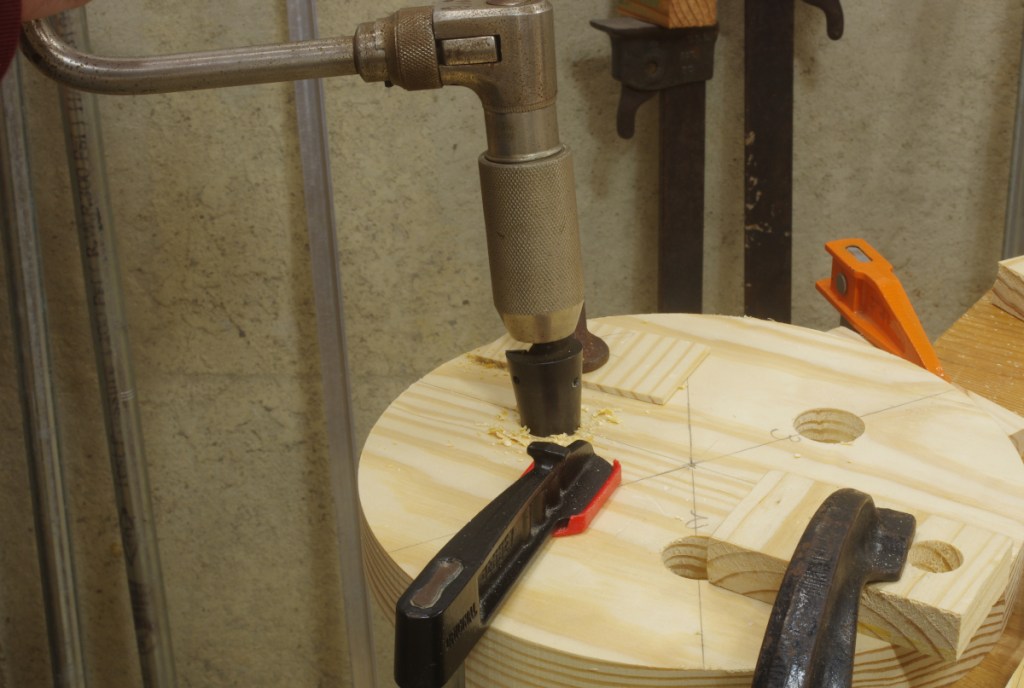
Then I can just put it into the vise, with the rabbet registering on the benchtop. The result is that (in theory, at least), you can hold the stock parallel to the benchtop and bench front to keep it in the right place:
With this system in place, I was still having problems. The tenon cutter isn’t large enough to engulf the whole octagonal profile of these legs. I was doing a rough shaping with the drawknife and saw rasp to get a cylinder to shove into the tenon cutter, with a little transition area to the outer surfaces. I determined that you need to be fairly precise about the size of that cylinder. I’d made it too small, which resulted in tapered tenons with a long rough unshaped area between the tapered part and the transition to the octagon:
This happens because the transition area eventually meets the end of the tenon cutter and cannot advance any more. This wouldn’t happen if the tenon cutter were larger than the stock being worked (which would be the case for most cylindrical legs), or if I wanted to do a more gradual transition (assuming that I were actually good enough with a drawknife to do that). Even though this 9/16″ version isn’t the largest tenon cutter that Lee Valley offers–the 5/8″ keeps selling out too quickly–it wouldn’t make much difference here.
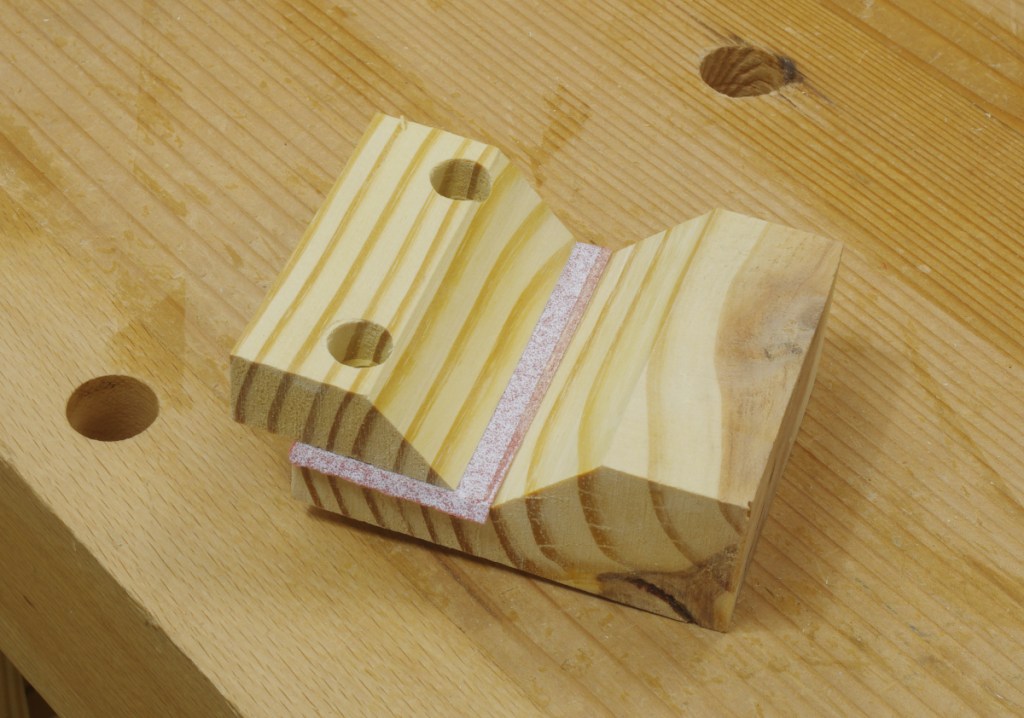
I decided to cut new transitions farther back in the stock and make newly-shaped cylinders bigger in order to bring the tapered part closer. Something tells me that this would be a lot easier with a lathe, but I don’t have one of those. I’d been putting it into my tail vise and just whacking away with a chisel, but the end would keep sliding around too much. So I interrupted myself again and made a stop with a mouth on one end that I could secure into two dog holes (to keep it from swiveling around):
This worked. As a bonus, you don’t need to secure it with the tail vise this way, making it really easy to turn the stock around so that you can work on all of the facets.
With this aid, I was able to shape everything a bit better and use the tenon cutter again. This made for a much nicer result:
I’m not worried about the 1/4″ between the transitions and the tapered part (this is the distance between the tenon cutter’s blade and its end).
Unfortunately, I spent so much time fooling around with these little shop aids and trying to figure out the best way to use them that I didn’t have any time to ream the holes for these things today. Oh well.
One small project that’s been lingering for a month or so is a narrow stand to hold some decorative stuff (such as a plant or worse). I planned to make a three-legged round-topped staked version. The difficulty is that the proportions don’t really conform to most furniture projects, so I wasn’t really sure what would look halfway decent.
Fortunately, there is a solution, described in The Anarchist’s Design Book, also referenced in a recent LAP blog post. You make a quickie half-scale model to see if it works, and if it does, transfer the angle(s) from that. So I made myself a little r = 2.5″ top and set about getting some wire hangers to dismantle in order to mock up the legs.
That’s where I came across two problems. First, there’s sort of a shortage of wire hangers in this house, and an acute shortage of ones that aren’t bent all to hell, which would make it difficult to get a halfway accurate resultant angle with the long legs that this project requires. Second, I had this difficulty: How would I get a better feel for how the legs would look meeting the top, as well as the overall weight of the legs, taking into account some of the thickness? I also didn’t know what length of leg I wanted.
So maybe I don’t have a lot of straight wire hangers around, but I do have a lot of narrow offcuts of wood lying all over the place. I decided to try drilling a hole in the end and stuffing a smaller piece of wire hanger in there:
And then, I wasn’t sure of the inset from the edge where the legs should be attached. Again, because this is not a chair, I wasn’t really sure what might be appropriate. So I drilled two sets of holes in the top so that I could play with both:
At least the sightlines for this thing are really easy to determine.
With this in place, I attached scale 30″ legs in the outer holes to see how this would look:
As I suspected, it was awkward. There were problems viewing from different angles and the proportions are also a bit unfortunate. I tried putting the legs into the inner set of holes, and that was also strange.
So then I tried scale 26″ legs, attached to the inner holes:
This seems to work better. It looks like a stand, I guess. Hopefully it does not look like a stool, though it might actually be able to perform that function.
In any case, before getting the resultant angle, I just tried fixing the wires in place with “Shoe Goo” to see if I can keep them from wriggling around so much. (Others use epoxy, but I don’t have any of that right now.)
A secondary title would be “A Study in Overthinking.” There’s a spot near our back door where we’ve been wanting to put up a small shelf with some knobs or hooks or something underneath. I decided that it wasn’t worth procrastinating any longer, so I grabbed a piece of eastern white pine, flattened and thicknessed it, and set out to do the actual construction. At first, I thought that I’d make some sides as brackets and use cut nails to put the whole thing together (too much “Anarchist’s Design Book,” you see).
So I plowed a groove into one of the boards that was to be the back. This would accept the shelf:
I had to do this in three stages because (a) I don’t have many blades for the plow plane, and my widest one was a little too wide, and (b) I failed to think ahead that I could have just thicknessed to the width of that wide blade. When you’re overthinking, you wouldn’t accidentally want to think of something that makes sense, right? At least I rejected the sliding dovetail idea.
Then I quickly evened out the bottom with a router plane, and got to fitting the shelf into the back. At that point, I tossed the nail idea out the window because it was faster to glue the thing in place:
The remaining work would be to make the sides that would act as brackets. I was still planning to nail those on, but then I realized that because I glued it, this thing was probably already stronger than it needed to be. There was the option of omitting the brackets altogether and letting the shelf “float,” but I didn’t think that look would fit the intended setting.
My first thought was to just make diagonal braces dovetailed into the rear and top, but partway into making the brace, I decided that this was a dumb idea. It helped that I was feeling lazy. I ended up just mitering the brace with no additional joinery, and just glued them on:
I didn’t even bother to use clamps. In other applications, this might strike one as flimsy, but remember that the purpose of these is decoration. I’m not timber-framing. Still, I did prepare the mitered surface with thinned liquid hide glue before the normal (liquid hide glue) application.
For what it’s worth, I did try knocking them off after the glue dried, and they didn’t budge.
And so here’s the result, edges broken and ready to be painted (at least, I think I’m painting it):
Now I’m destined to overthink the paint. (I think it’s supposed to be white.)
This project is finally done and in its intended location:
Here’s the obligatory drawer-open, from-the-side photo:
For those who haven’t been following this project, the dark wood is black walnut, the lighter wood is ash. Drawer bottoms are western redcedar, and a few other parts here and there that you can’t see are tuliptree (“yellow-poplar”). Finish is the usual varnish, and this time, I waxed the top, anticipating heavier wear than usual.
The photos here show how the panels and drawers are arranged so that each side looks like it has a continuous piece of ash, framed in. This wasn’t too bad to execute, even though the drawer fronts are a lot thicker than the panels on the sides. You just have to mark stuff out and remember where everything is. It also helps to remember what your plans were in the first place, which can admittedly be a problem when a project takes as long as this one.
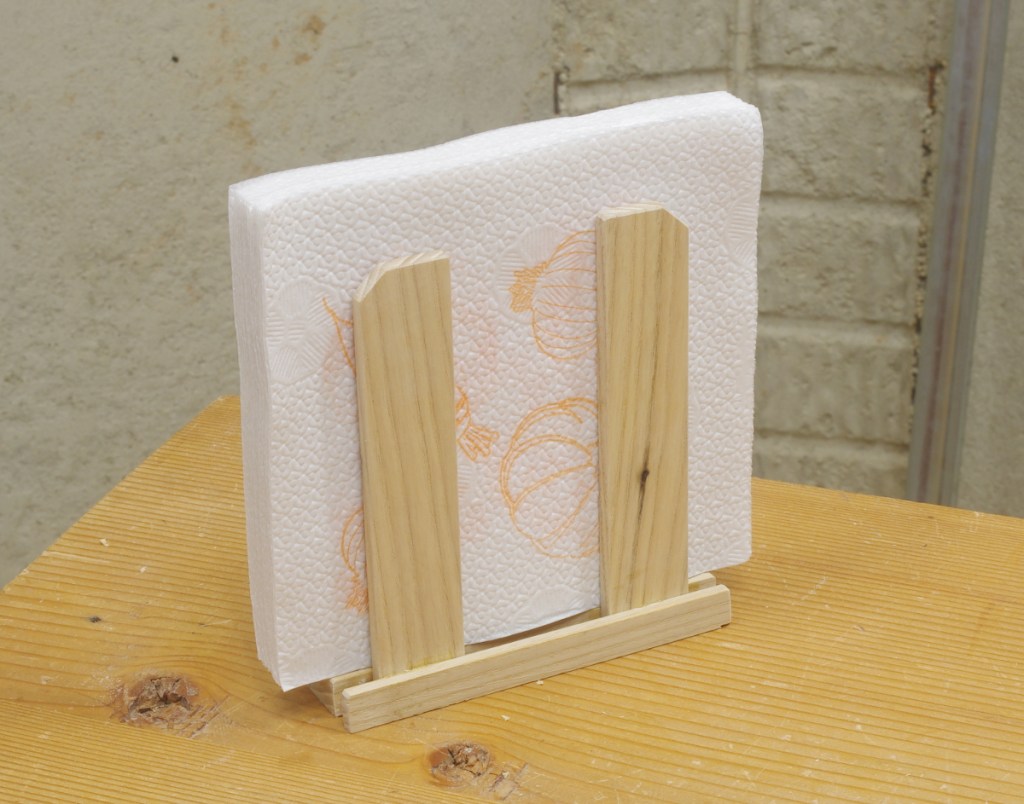
I’ve had a crazy, yet admittedly modest dream for many years: That we would start using napkins instead of paper towels (as napkins, that is), and that I would make a napkin holder for the napkins. Last week, SHMBO made the decree that napkins would now be used in our household.
I was excited. See, I had grand plans for the napkin holder, involving delicate mortise-and-tenon joints and all sorts of other nonsense. These dreams pretty much evaporated the moment I took the 1/8″ mortise chisel into the ash and realized that for what I wanted to do, it would tend to split badly.
So I sat on the sawbench for about 20 minutes and fooled around with the wood that I had milled to size, and realized that I could probably make something halfway decent relatively quickly if I just sandwiched stuff together. I ended up with this:
I was careful to make the protruding napkin width equal on the two sides and the top, for whatever that’s worth. But the thing that I’m most happy about with this project is that it happened very quickly. That’s a true rarity in these parts.